UniFi Small Office Setup: Professional Office Case Study
How we designed and installed a complete UniFi network for a 7-person professional office — WiFi 7, cameras, and door access in one system. Includes floor plan, priced BOM, and VLAN config.


A professional site assessment is the first step in every office network project. For a 1,500–2,500 sq ft commercial suite — an accounting firm, law practice, or growing agency — a 45-minute walkthrough determines what the build costs, what cable needs to be pulled, and which gateway fits the equipment room. Skipping it means speccing from guesswork.
Here's what that assessment found, and what we built from it.
How Do You Assess an Office Before a UniFi Installation?
A professional site assessment requires verifying existing cable categories, locating the ISP demarcation point, and determining equipment housing — three variables that set the project budget before any hardware is specified. For the full small business network setup planning context, see our dedicated guide.
Cabling: Cat5e, Cat6, or nothing
Cat5e in good condition supports up to 2.5GBASE-T — and the USW-Pro-HD-24-PoE's multi-gig ports take full advantage of that. Every existing Cat5e drop in this office auto-negotiates to 2.5 Gbps on the new switch, which is a meaningful upgrade for every wired workstation and device on the existing cable plant, without touching a single wall run.
The U7 Pro XG and U7 Pro XG Wall both have 10GbE uplinks, and this is where the cabling plan diverges from the existing infrastructure: both AP drops are new Cat6A runs, pulled during this install. Cat6A supports the full 10G channel at any standard office run length, so both APs operate at their full 10 GbE backhaul capacity. The result is a properly mixed deployment by design: 2.5 Gbps on every existing Cat5e port, 10 Gbps on the two new AP drops. The old wiring isn't a constraint — it's a baseline the switch already handles at multi-gig speeds, and the new runs to the APs bring the wireless layer up to match.
The ideal scenario—and the most common in South Florida offices—is existing Cat5e or Cat6 routed through a drop ceiling. Permit-free plenum access, sub-100-foot runs, and no conduit work keep labor cost predictable. The harder scenario is finding nothing: estimating the labor to pull new cable from scratch is the first thing the walkthrough enables, and it changes the budget before anything is quoted.
ISP connection: where it comes in and what you're working with
AT&T Business Fiber and Comcast Business are the dominant providers in most South Florida commercial buildings. Both deliver the 1 Gbps symmetrical service that makes fiber the right choice for this scenario: low latency for video calls, reliable upload for cloud backups, a service level agreement that matters when downtime costs money.
During the walkthrough, confirm where the demarcation point is. In a dedicated IT closet, this is straightforward. In buildings where telco facilities are on a different floor or in a shared utility room, you're routing cable from that point to your equipment location — something worth knowing before the install, not during it.
Equipment home: IT shelf vs wall-mount rack
The distinction matters for gateway selection. An IT shelf on the wall handles a UCG Max and a switch cleanly — and that's the right call when the room truly has no rack option. A wall-mount open-frame rack (around $100) is the step up: better cable management, better airflow, and it unlocks the rack-mounted gateway options. For this case study, the client had a bare shelf in the equipment corner — and a $100 wall-mount rack was added to the install scope during project planning. That decision determines the gateway.
Both the UDM Pro Max and the USW-Pro-HD-24-PoE rack-mount cleanly in 1U, with a 10G SFP+ DAC cable running between them.
One thing to catch during the walkthrough: floating workstations
Open-plan offices with desks in the middle of the floor — no network drops nearby — are the one structural challenge that surprises first-time office installers. Either plan a ceiling drop to a floor poke-through during the cabling phase, or position a switch in that zone. Finding this during the walkthrough means it's a line item in the quote. Finding it on install day means a scope change conversation.
Project Profile: The Build This Article Is Based On
Client: 7-person professional firm — a small accounting practice and financial advisory office.
Space: 1,800 sq ft, single-floor commercial suite in a Doral office park.
Internet: AT&T Business Fiber, 1 Gbps symmetrical. Demarcation in the rear equipment corner.
Existing infrastructure: Cat5e throughout with a drop ceiling. Several wall jacks already in place. No structured cabling in the conference room — that required two new drops.
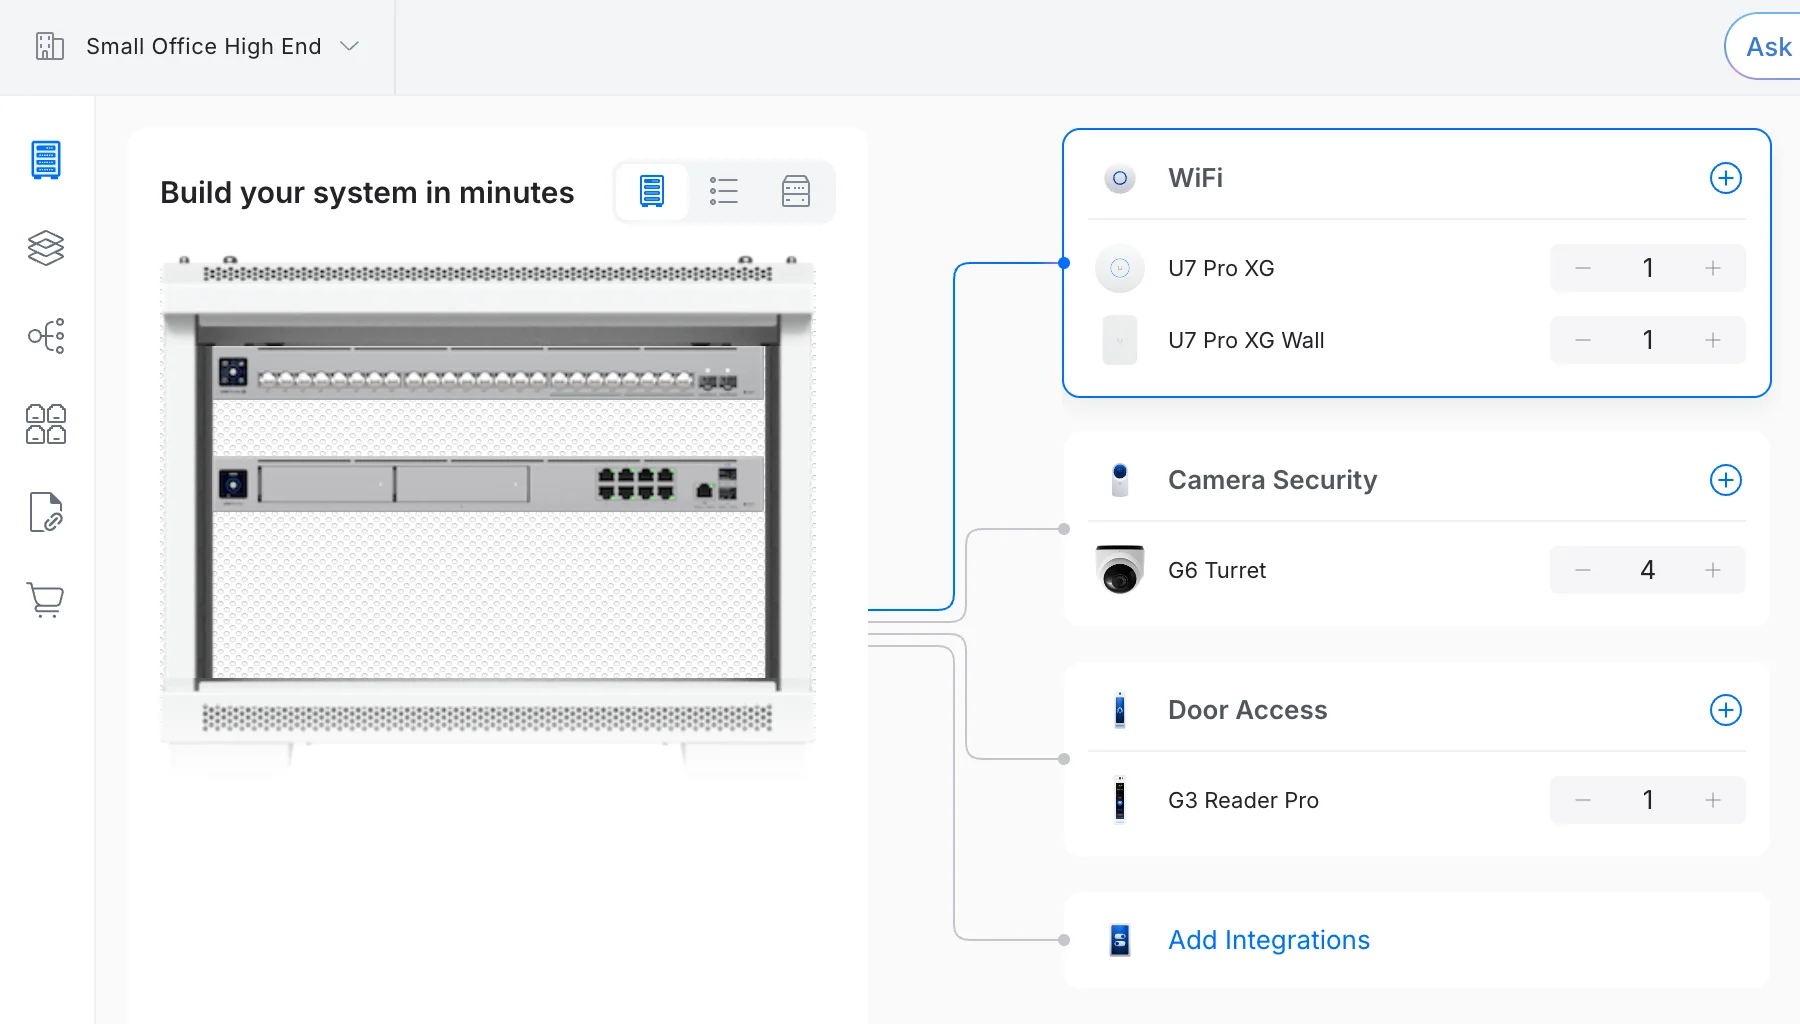
Requirements: Reliable WiFi across the open work area and conference room. Separate guest SSID. Camera coverage at the entry and reception. Door access at the main entry. Everything managed from a single interface.
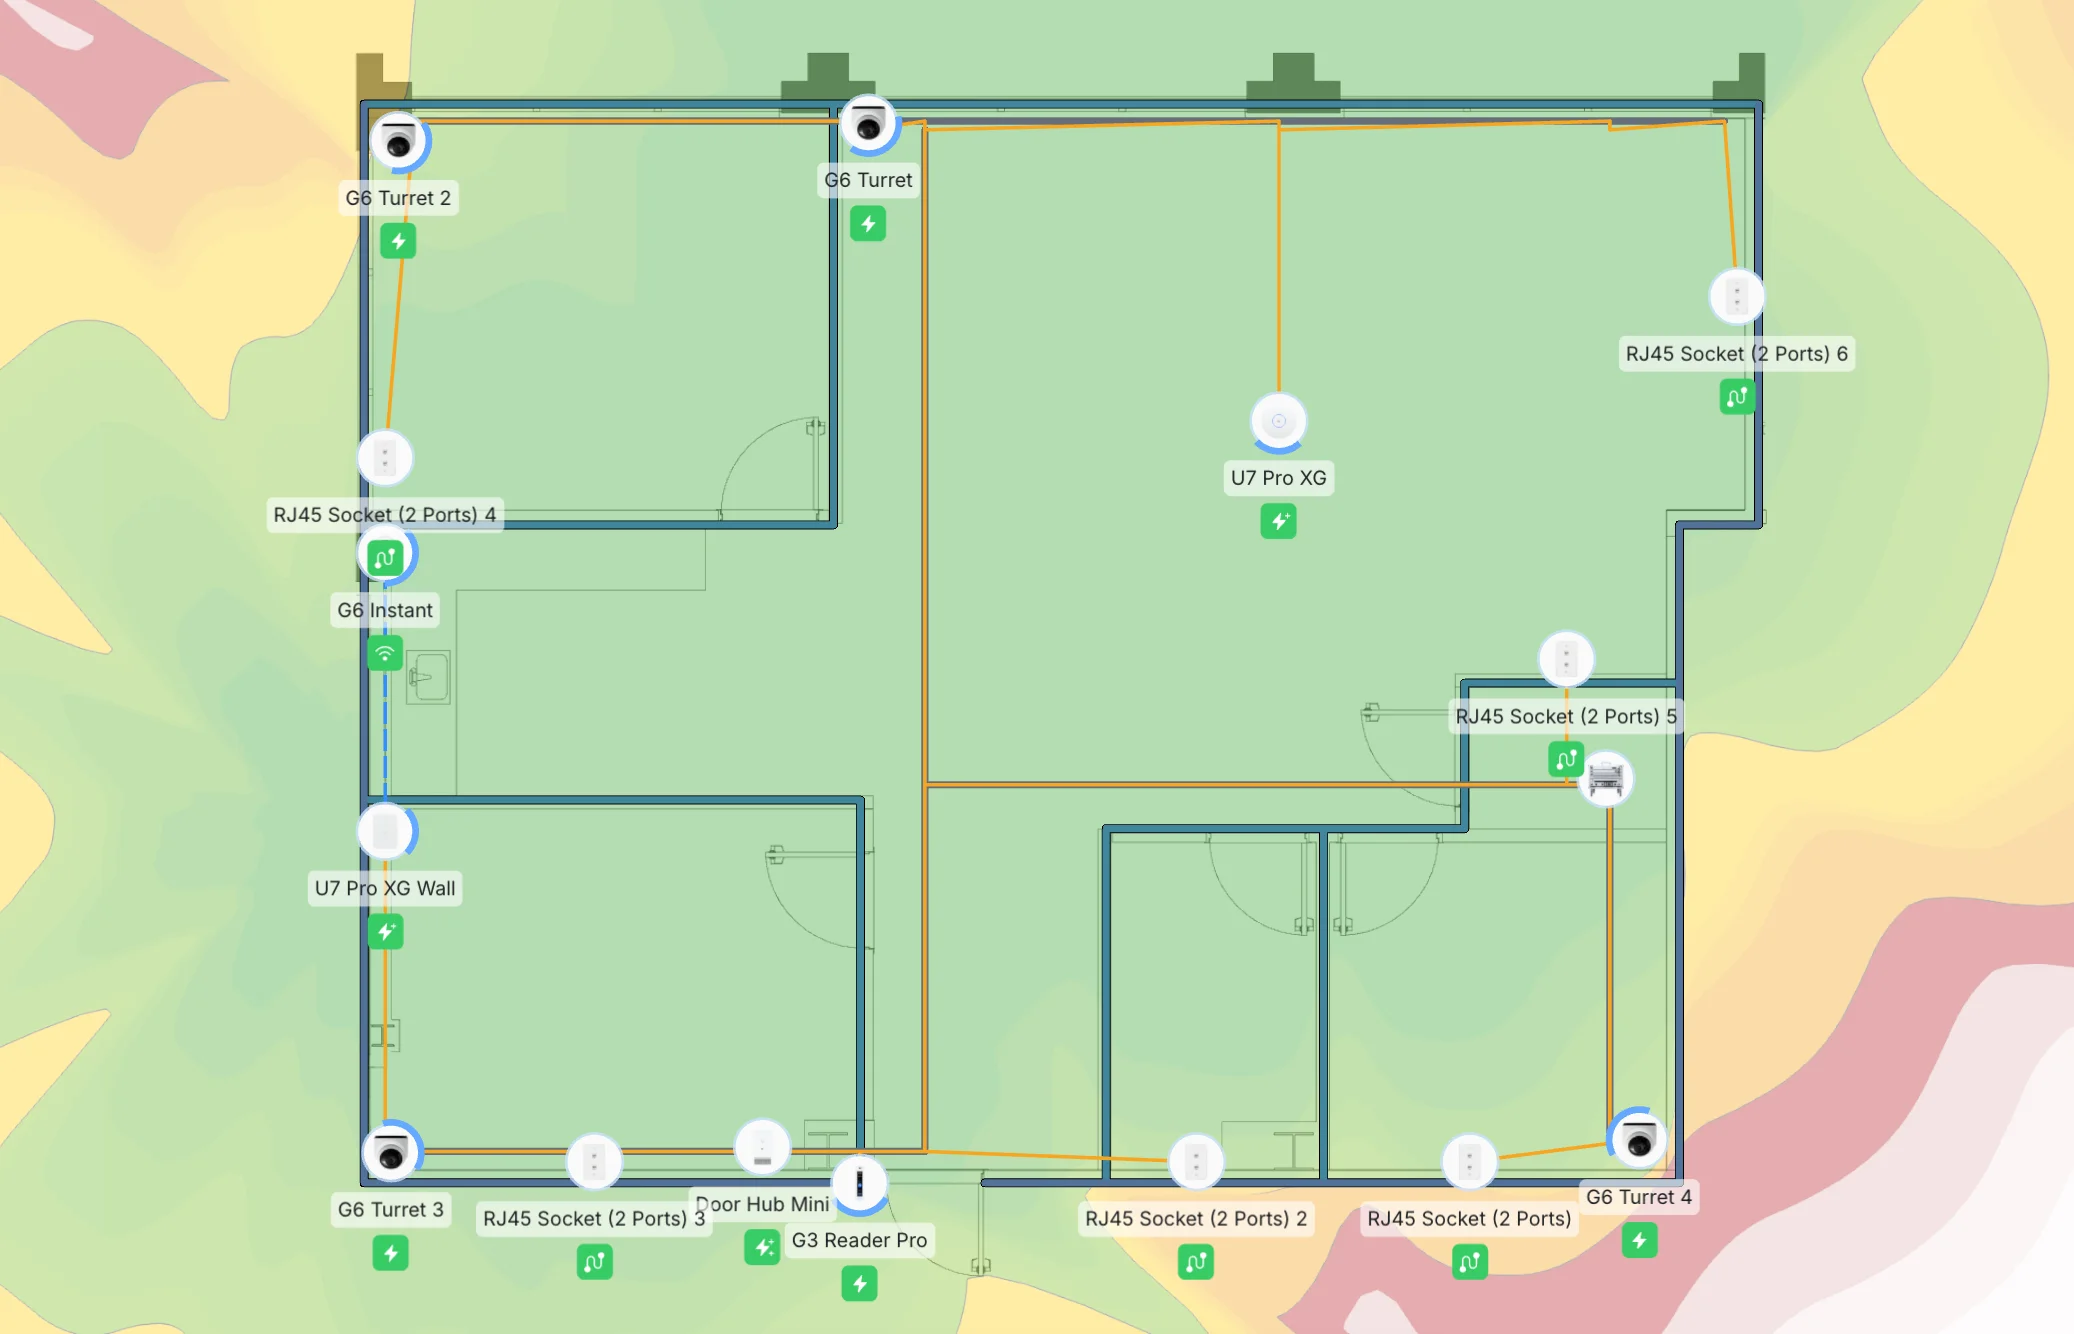
Floor plan: ceiling-mounted U7 Pro XG in the open work area (center), wall-mounted U7 Pro XG Wall in the conference room (right), G6 Turret cameras at entry, reception, and two corridor points, G6 Instant at reception desk, G3 Reader Pro outside main entry, Door Hub Mini above the ceiling near the door frame. All structured cabling routes back to the equipment rack.
This is the layout that drives the equipment list below. Notice where the APs sit relative to the zones they cover, where the cameras capture entry and reception without blind spots, and where the door access hardware routes back to the IT shelf.
Affiliate Disclosure: This article contains affiliate links. If you make a purchase through these links, we may earn a small commission at no extra cost to you.
Equipment Selection: What We Chose and Why
Five hardware categories, specced in the order a project assessment confirms them: gateway, PoE switch, access points, cameras, door access. The decision logic for each category is more useful than the product name alone.
Gateway Selection: UDM Pro Max
The gateway choice here is driven by two constraints confirmed during the assessment: there's a wall-mount rack, and the access points are U7 Pro XG units with 10 GbE uplinks. The switch has 10G SFP+ uplinks. For the gateway-to-switch backbone to run at 10G, the gateway needs a 10G SFP+ port. The UCG Max has none — all five of its ports are 2.5G RJ45, which caps the backbone at 2.5G regardless of what else in the rack can do. The UDM Pro Max has two 10G SFP+ ports. That's the selection logic.
Gateway Decision: Why the UDM Pro Max
UDM Pro Max ($599) — This build's gateway 1U rack. 5 Gbps IPS throughput. Two 10G SFP+ ports — one connects to the USW-Pro-HD-24-PoE via a 10G SFP+ DAC cable for a full 10G gateway-to-switch backbone, the other available for WAN or secondary uplink. Supports up to 15 × 4K cameras with the built-in Protect engine — the 5-camera build here occupies five of those fifteen slots, leaving ten for future growth with no hardware change. NVR storage comes from a built-in 128 GB SSD (short-term retention) plus two onboard 3.5" HDD bays for extended recording. Handles routing, firewall, multi-SSID, VLANs, UniFi Protect, UniFi Access, and UniFi Talk from one interface.
Why not the UCG Max ($279+)? The UCG Max has no 10G ports. Every one of its five ports is 2.5G RJ45. On a gigabit switch, that's fine. Paired with the USW-Pro-HD-24-PoE — which has 10G SFP+ uplinks — the gateway becomes the bottleneck at 2.5G. If the equipment room is shelf-only with no rack option, the UCG Max remains the right shelf-mountable choice. But it's not the right match for this build.
Why not the UDM Pro ($379)? Solid gateway — 3.5 Gbps IPS, 1U rack, 10G SFP+ ports. For a standard gigabit deployment or a smaller camera count, it's frequently the right call. On this build, the UDM Pro Max's 5 Gbps IPS throughput and onboard HDD bays justify the $220 delta: the IPS headroom future-proofs a multi-gig WAN upgrade, and the HDD bays allow cost-effective long-term recording without an external NVR.
Camera headroom (UDM Pro Max): The UDM Pro Max supports up to 15 × 4K cameras natively. The 5-camera build here — four G6 Turrets and one G6 Instant — occupies five of those fifteen 4K slots. Ten remain available without any gateway change. If camera count grows beyond 15 × 4K, pair the UDM Pro Max with an enterprise NVR to expand further.
Storage: The UDM Pro Max ships with a built-in 128 GB SSD and two empty 3.5" HDD bays. For this 5-camera deployment, adding a single 4 TB HDD (available from ~$100) to one of the bays provides approximately 30 days of continuous 4K recording retention — sufficient for most professional office security requirements. No external NVR is needed at this camera count.
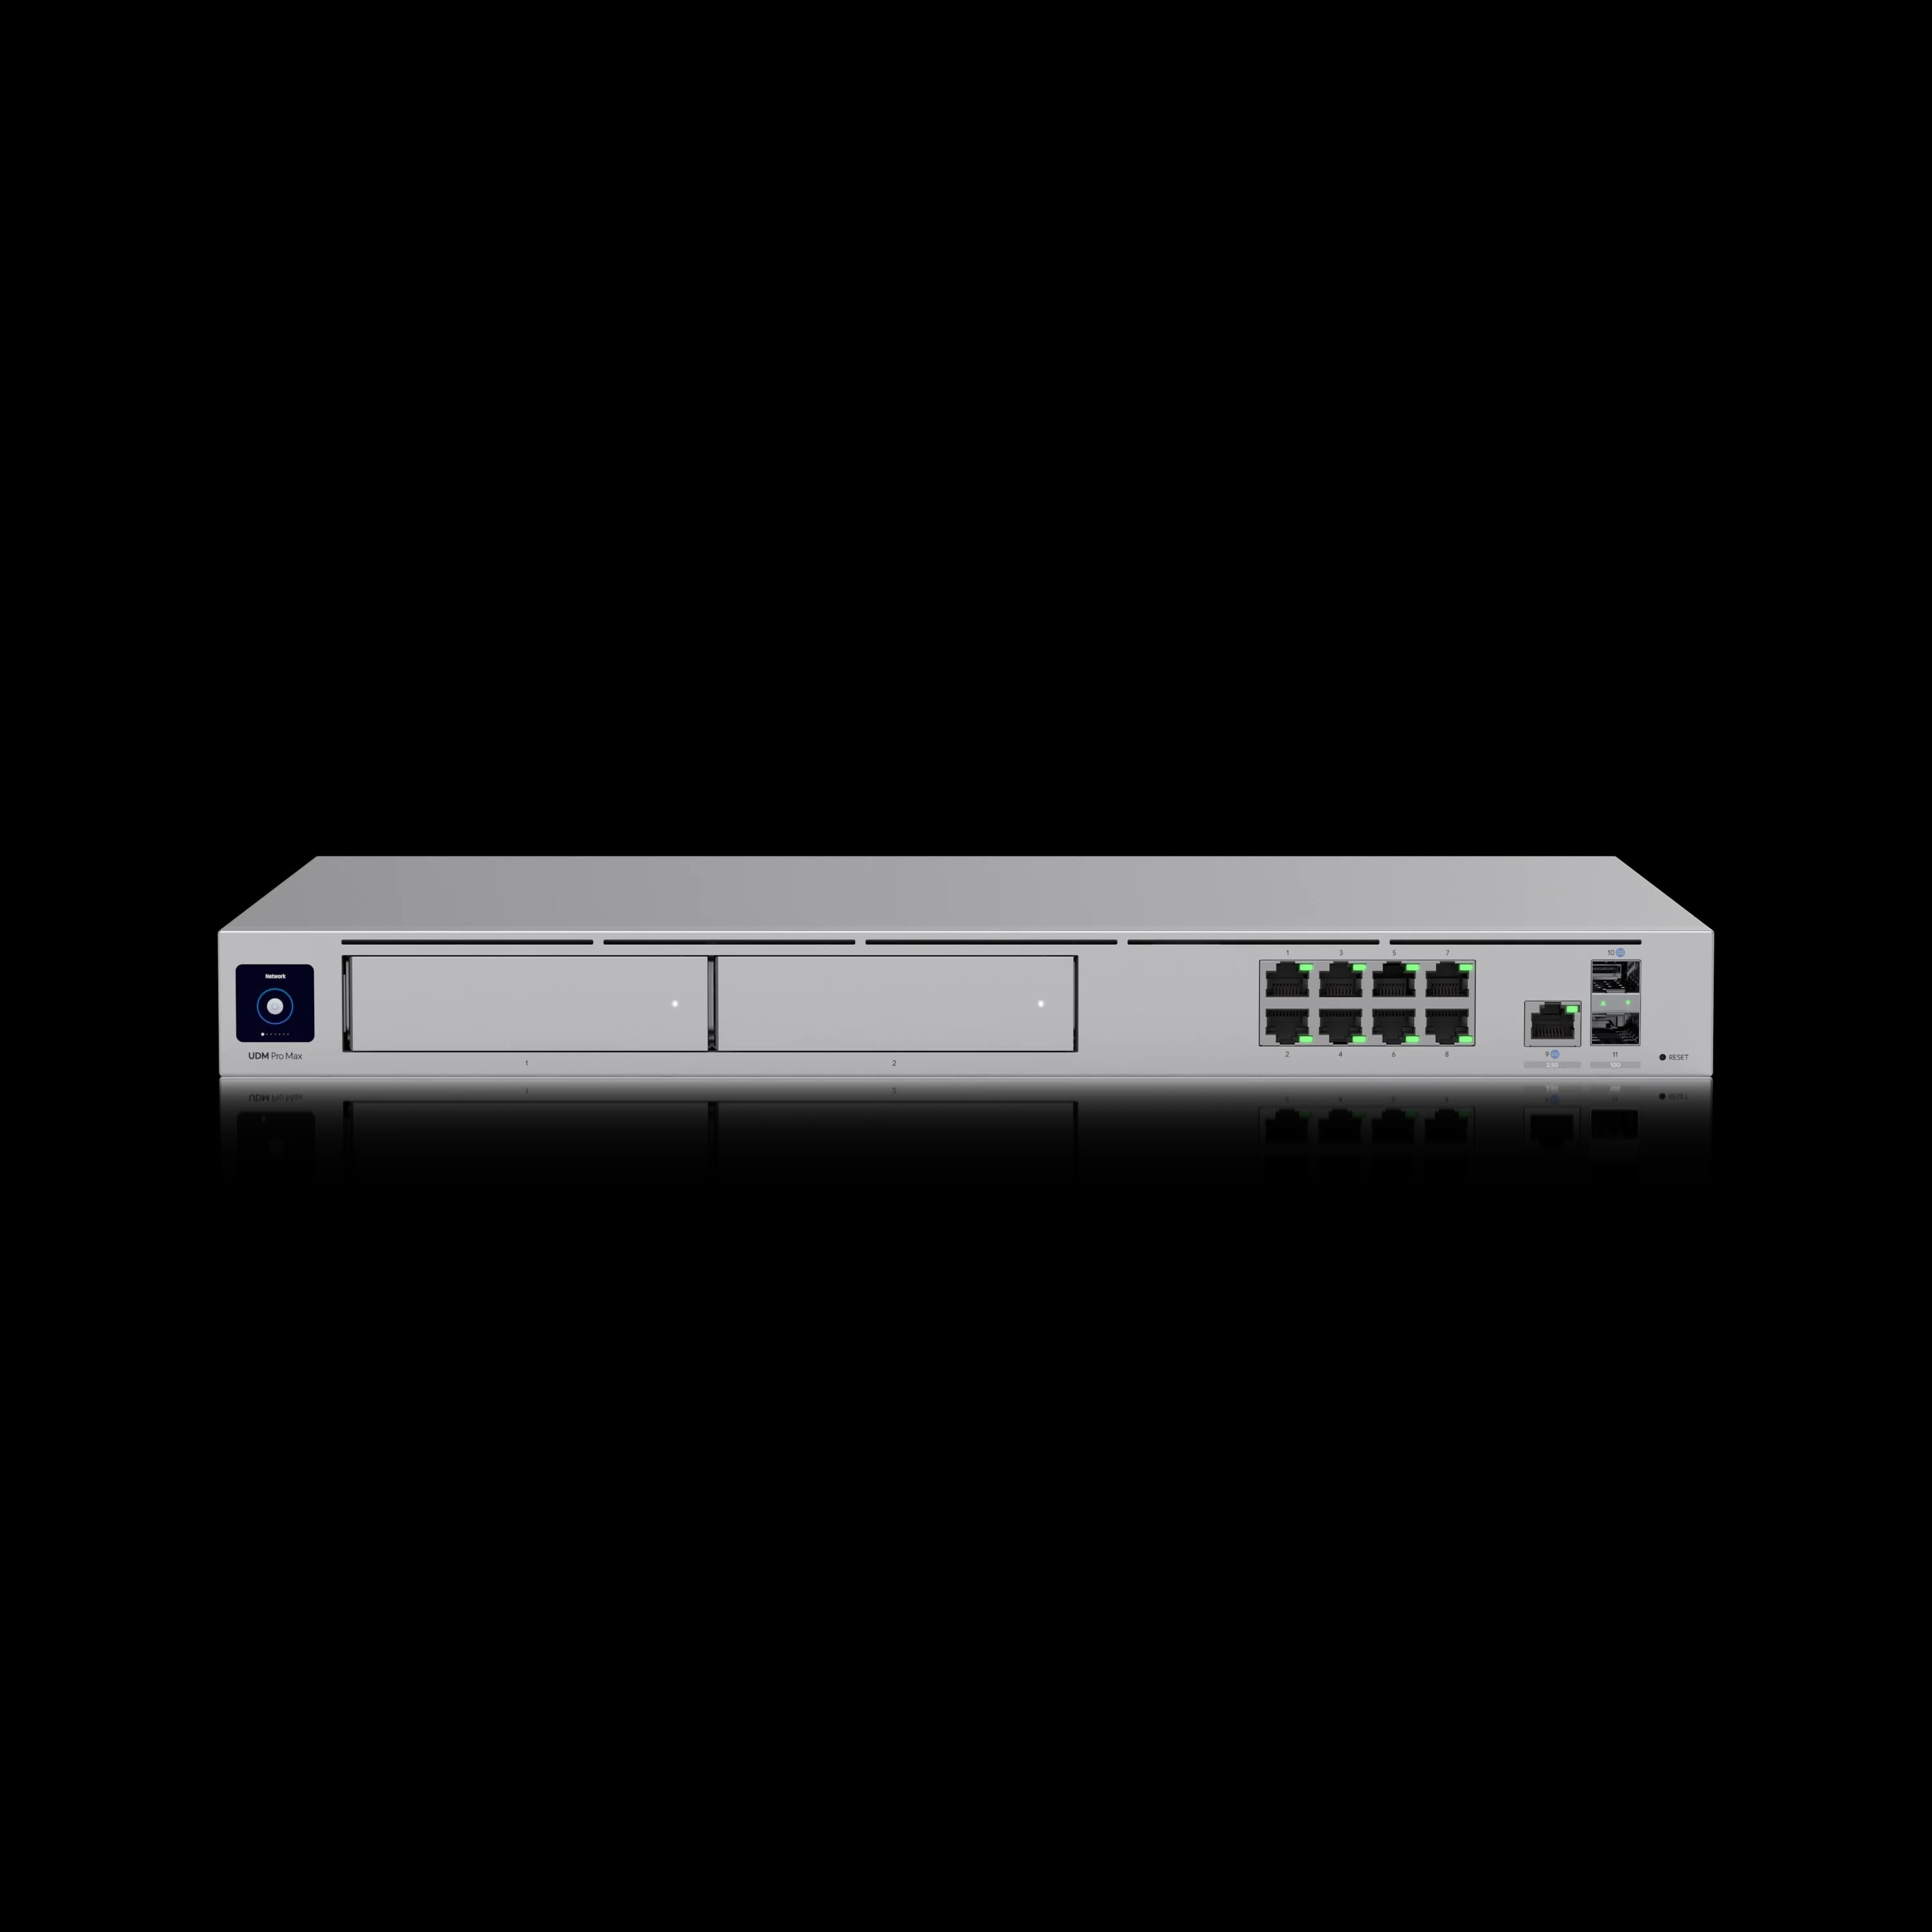
UniFi Dream Machine Pro Max
1U rack gateway with dual 10G SFP+ ports, 5 Gbps IPS, built-in NVR HDD bays, and support for 200+ UniFi devices. Pairs directly with the USW-Pro-HD-24-PoE for a full 10G backbone.
- 5 Gbps IPS routing
- Dual 10G SFP+ ports
- Up to 15 × 4K cameras (Protect)
- 2× 3.5" HDD bays + 128GB SSD
- UniFi Access built in
- 200+ device support
*Price at time of publishing
Switching: USW-Pro-HD-24-PoE (600W)
The USW-Pro-HD-24-PoE is the right switch for this build, and the reason goes beyond port count. This is a multi-gigabit switch: existing Cat5e drops auto-negotiate to 2.5 Gbps on the multi-gig ports, and the two new Cat6A runs pulled to the AP locations run at full 10 Gbps. Every wired device in the office steps up to 2.5G automatically on the existing cable plant; both APs get 10G backhaul on the new drops. The 600W PoE budget handles the full device load comfortably — we're drawing approximately 120–150W total on this install.
This is the switch choice that makes the overall installation a proper infrastructure upgrade rather than a 1G refresh. A standard gigabit switch would have left every existing Cat5e port at 1 Gbps; the HD switch upgrades the whole office in one step. The two new cable runs to the APs were already part of the plan — those drops were being pulled regardless. Pulling Cat6A instead of Cat6 at that point costs nothing extra and delivers the full 10G the APs are specced for.
A 48-port switch is rarely needed at this scale unless the office has an unusually high density of wall jacks. A 16-port switch is undersized once you account for cameras and access hardware. The 24-port is the practical center.
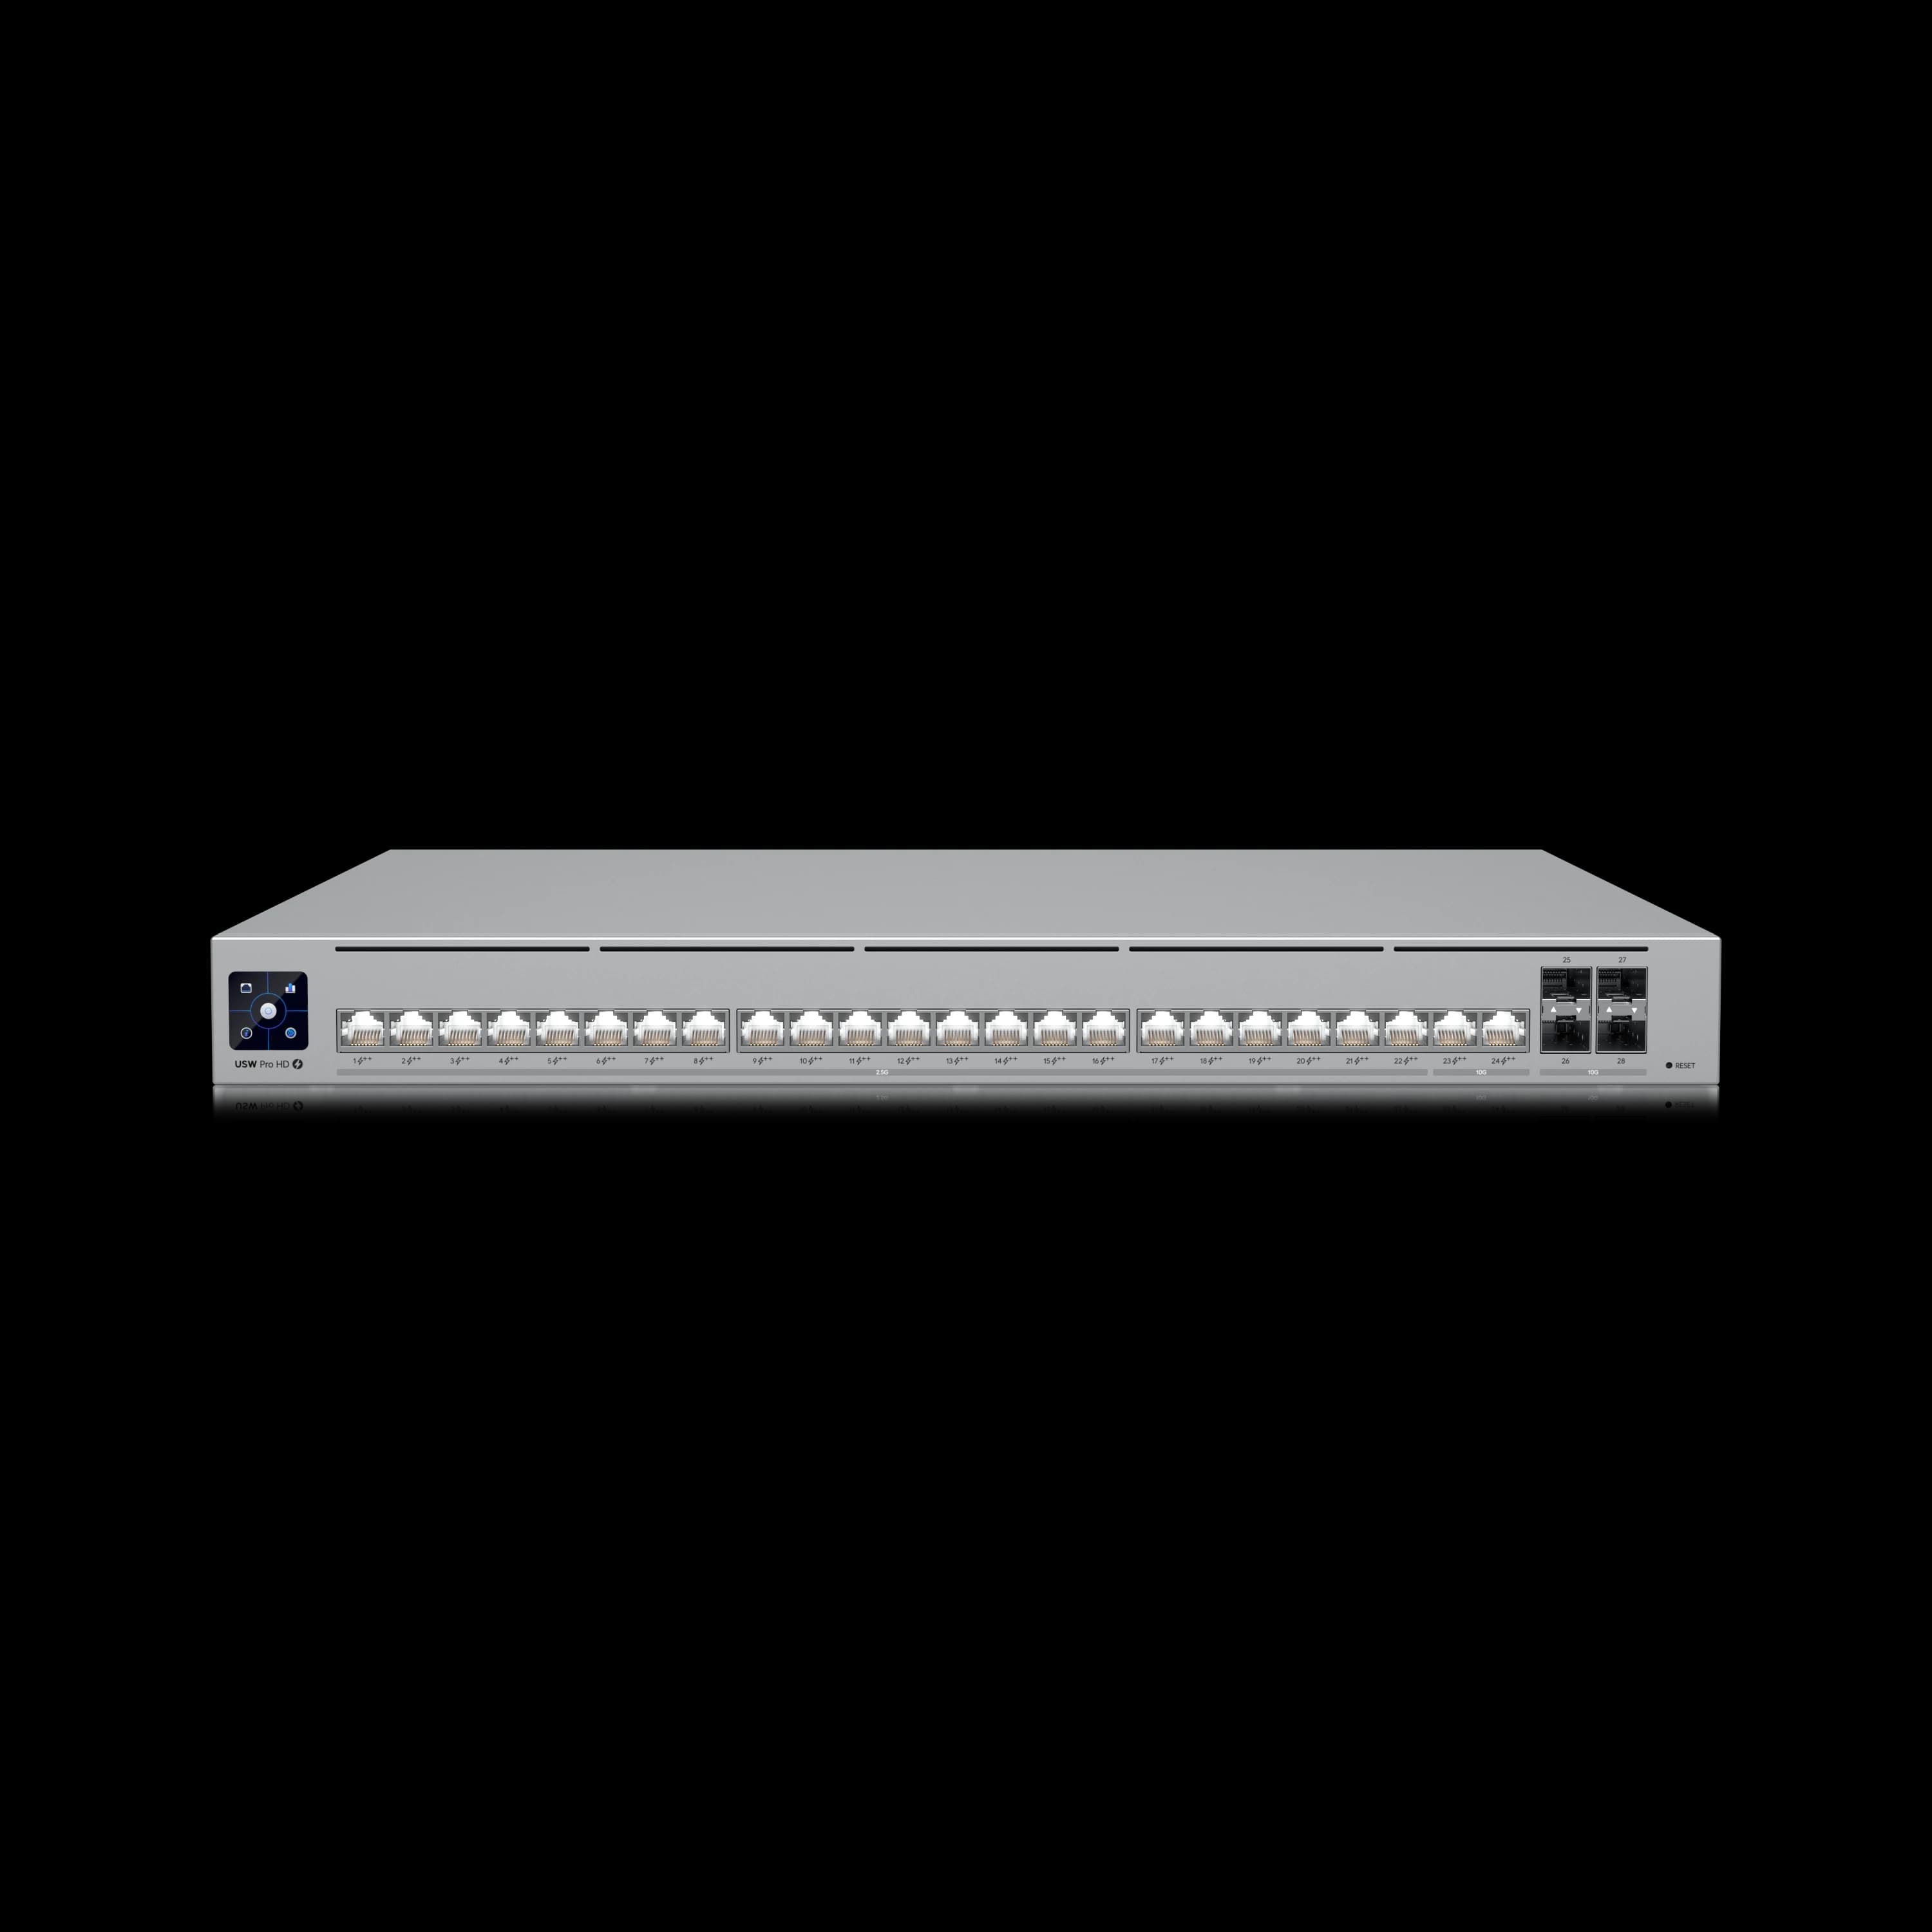
UniFi Switch Pro HD 24 PoE
$99924-port multi-gig managed switch with 600W PoE budget. Existing Cat5e runs at 2.5G; new Cat6A AP drops at 10G. A genuine infrastructure upgrade in one switch.
Wireless: Two U7 Pro XG APs
Two access points in a typical small office: one ceiling-mounted in the open work area, one wall-mounted for the conference room. The floor plan above shows this configuration.
The reason for two dedicated APs rather than one central unit: the conference room use case is the deciding factor. Video calls depend on consistent upload throughput and low latency — precisely what a shared radio serving both the open floor and a conference room can't guarantee during peak hours. A dedicated wall-mounted AP means the conference room gets its own radio, its own airtime, and predictable performance when eight people are on a Zoom call.
Coverage logic for placement: the ceiling-mounted U7 Pro XG sits centered in the open work area, covering the staff desks and the main corridor. The U7 Pro XG Wall mounts at seated-user height on the interior conference room wall — not above the door, which is a common mistake that leaves the near-wall seats in a dead zone. For deeper context on AP selection across this product line, see our UniFi WiFi 7 APs for business guide.

UniFi U7 Pro XG
$199Ceiling-mounted 6-stream WiFi 7 AP with 10 GbE uplink. Primary AP for open-plan office coverage.

UniFi U7 Pro XG Wall
$279Wall-mounted WiFi 7 AP with 10 GbE uplink. Dedicated radio for conference room coverage — keeps video calls off the shared open-office radio.
Cameras: G6 Turret and G6 Instant
The G6 Turret is the PoE camera for fixed, high-coverage positions: building entry, reception area, main corridor, and rear corridor. At 4K with the Multi-TOPS AI engine, it handles license plate recognition at the entry and person detection throughout the space. The 3-axis manual adjustment matters here — getting the entry camera angle right during install prevents a bracket adjustment call later.
The G6 Instant fills a different role: it's the right camera for positions where a compact, less conspicuous form factor fits better — in this install, the reception desk area where a large turret housing would be intrusive. The G6 Instant connects over WiFi, which keeps the wiring clean at that location. For offices that don't want cameras at all, skip this section entirely — cameras are a modular addition, not a core networking requirement.
For more on building a camera system within a UniFi ecosystem, see our UniFi Protect camera coverage guide.
Door Access: G3 Reader Pro and Door Hub Mini
The door access configuration for this install: a G3 Reader Pro mounted outside the main entry, a Door Hub Mini installed above the drop ceiling near the door frame, wired to a standard electric strike lock and an exit button on the inside. The Door Hub Mini handles the single-door control cleanly — it has one lock terminal, two PoE ports for the reader and any accessories, and draws power from the switch. Everything routes back to the IT shelf via a single Cat5e run.
Check With Building Management Before Speccing Door Access
Many commercial office buildings have their own building-wide access control systems and don't allow tenants to install hardware that interfaces with the door frame or electric strike. Some buildings will also require their own system for common-area doors. This is a 5-minute conversation during the walkthrough that prevents a scope change during installation. If the building restricts tenant-side access control, cameras are still fully viable — the door access module is simply removed from the spec. For more on the UniFi Access door control system, see our full review.
Bill of Materials
Current pricing as of April 2026, verified at store.ui.com. Ubiquiti pricing shifts — confirm before quoting a client.
| Product | Qty | Unit Price | Total | Buy |
|---|---|---|---|---|
| UDM Pro Max | 1 | $599 | $599 | → |
| USW-Pro-HD-24-PoE | 1 | $999 | $999 | → |
| U7 Pro XG | 1 | $199 | $199 | → |
| U7 Pro XG Wall | 1 | $279 | $279 | → |
| G6 Turret | 4 | $199 | $796 | → |
| G6 Instant | 1 | $179 | $179 | → |
| Door Hub Mini | 1 | $129 | $129 | → |
| G3 Reader Pro | 1 | $379 | $379 | → |
| Wall-mount open-frame rack | 1 | ~$100 | ~$100 | — |
| Total Hardware | ~$3,659 | |||
| Optional Reliability Add-ons | ||||
| UniFi 5G Max (cellular failover) | 1 | $399 | $399 | → |
| CyberPower CP1500AVRLCD3 UPS (power conditioning) | 1 | ~$200 | ~$200 | — |
The UPS is not optional in our deployments — it's standard. Our 4-year fleet reliability data shows that power conditioning issues cause more operational incidents than hardware failures.
A note on installation cost. Professional installation for a fully pre-wired office — pulling the drops to confirmed locations, terminating, testing, mounting hardware, and configuring the network — runs $800–$1,500 and typically requires 6 to 8 technician hours. Labor hours are consistent regardless of geography; the dollar figure varies by market. For this specific install, two new drops to the conference room added approximately $300 and roughly one additional hour to the cable work. Every new run through a finished wall or ceiling section adds cost and time; every run through an open drop ceiling does not.
A technically capable owner who is comfortable with basic networking can treat this as a weekend DIY project in a fully pre-wired office. UniFi's setup flow — adopt devices through the UniFi Network or Protect app, configure VLANs, set up SSIDs — is approachable for someone who has done basic networking before.
How Should You Segment VLANs in a UniFi Small Office Network?
Segmenting a small office network into four dedicated VLANs isolates sensitive traffic, protects internal resources, and contains IoT and physical security hardware in their own segments.
- VLAN 10 — Staff: Trusted devices with full network access. Handles internal resources, shared printer, NAS (if present), and authenticated employee hardware. The staff SSID lives here; only enrolled devices should reach this segment.
- VLAN 20 — Guest: Internet-only access with client isolation enabled. Visitors connect to a separate SSID; compromised devices cannot communicate with the Staff VLAN or with each other. Apply a bandwidth profile capping guest devices at 20 Mbps down/up — prevents a visitor running a large software update from saturating the shared uplink during business hours.
- VLAN 30 — Cameras: No outbound internet access. The G6 cameras communicate locally with the UDM Pro Max's Protect engine and cannot initiate external connections or reach the staff network. This segment contains any camera compromise at the hardware boundary.
- VLAN 40 — IoT / Access Control: Isolated segment for the Door Hub Mini and any other IoT devices. The door access system communicates with the UDM Pro Max's Access service within this segment, separated from all IT traffic.
AP placement recap. The U7 Pro XG mounts centered in the open work area, cabled from above through the drop ceiling. The U7 Pro XG Wall mounts on the interior conference room wall at seated height, dedicated to that space. Both APs broadcast the Staff and Guest SSIDs; client devices connect to whichever AP delivers the strongest signal. The floor plan above shows the coverage zones and why the conference room benefits from its own dedicated radio.
For the broader architectural thinking behind this segmentation — how to design a UniFi network for a professional environment, not just configure it — see our UniFi office network design guide. This case study is the concrete build; that article is the planning reference.
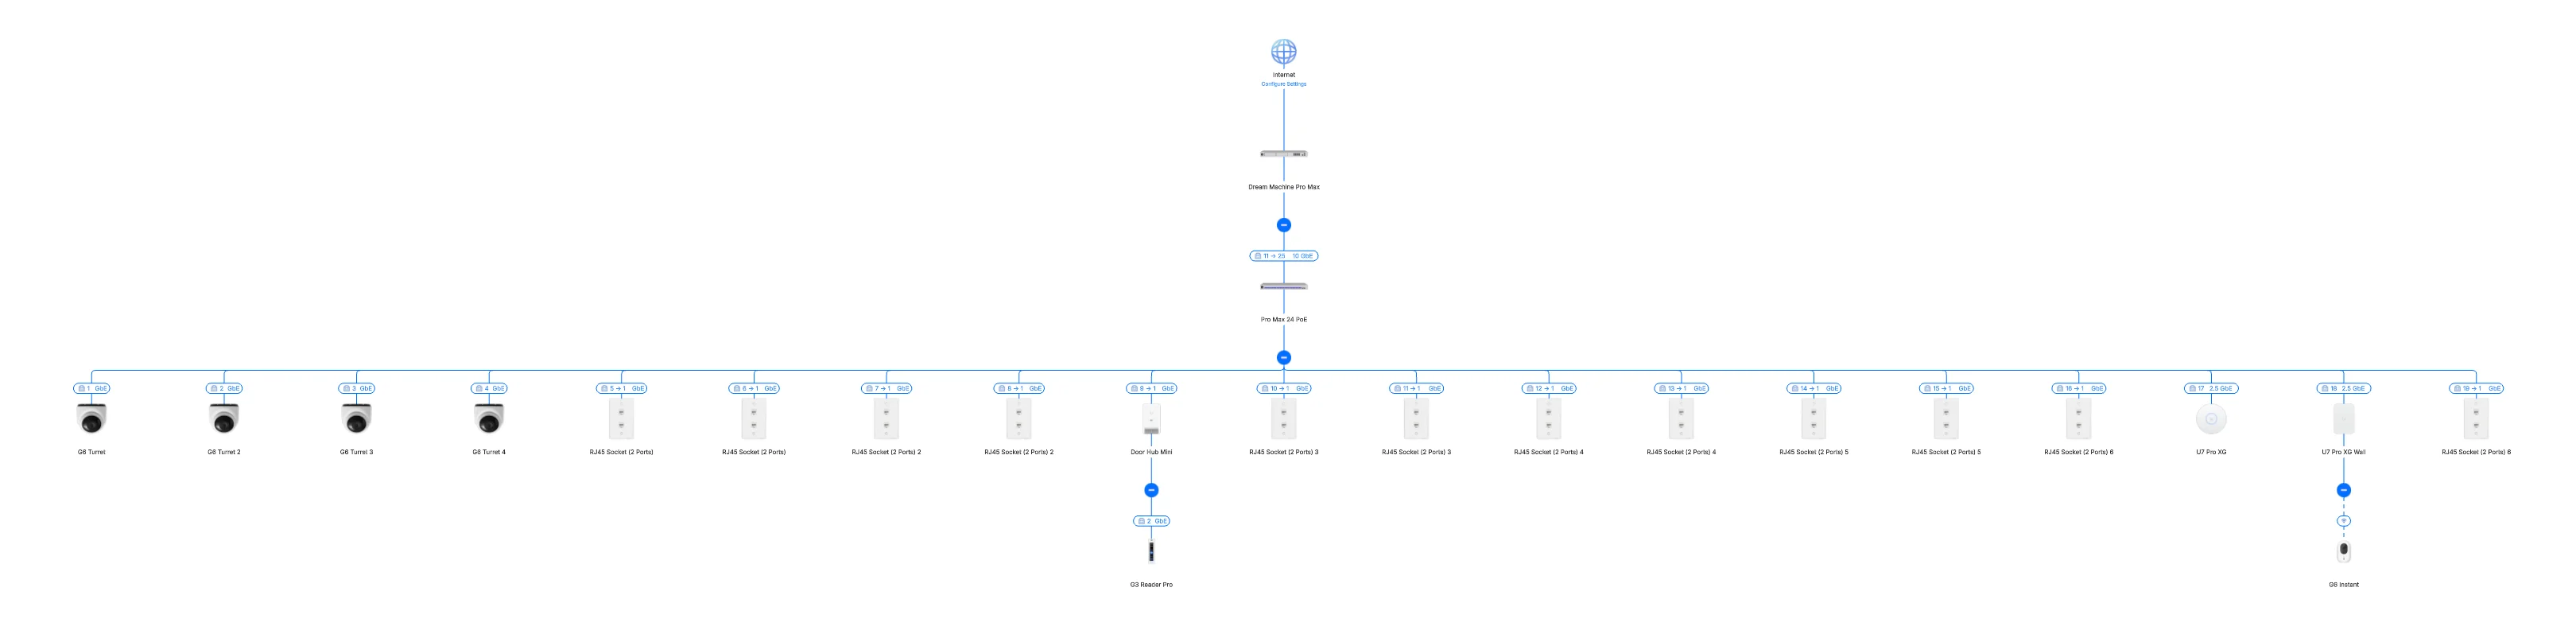
UniFi Network topology view: every adopted device visible from a single interface, automatically organized by the VLAN structure above.
Installation Notes: What to Watch For
Five things that come up on every small office install. None of them are in the product documentation.
1. Plan cable drop locations before pulling cable. Mark the ceiling grid coordinates for each AP and camera drop on a floor plan before any cable moves. A data jack that ends up 4 feet from where the AP needs to be is a common error in drop-ceiling offices when runs are planned on-site without a marked-up floor plan. The cost to fix it is not the cable — it's the return trip.
2. Verify PoE class for each device at spec time. On this install, 5 cameras, 2 APs, 1 reader, and 1 door hub draw approximately 120–150W of the USW-Pro-HD-24-PoE's 600W budget. Comfortable. But verify PoE class for each device before assuming — some cameras draw PoE+ (802.3at, up to 30W), others draw standard PoE (802.3af, up to 15.4W). The switch handles both; the power budget math is the thing to confirm.
3. A wall-mount rack is required for this build — and the right call on every job. The UDM Pro Max is a 1U rack-mount device — it requires a rack. A basic open-frame wall-mount rack runs about $100. On this install, adding the rack to the scope was a straightforward decision: cable management, better airflow, equipment stays accessible for service calls. Clients occasionally resist the cost on first-time installs. It pays for itself on the first service call, when the alternative would be a shelf with cables draped over hardware that needs diagnosis. If the client has a dedicated IT closet, a wall-mount rack is a direct upgrade for $100. For cable termination: a 24-port keystone patch panel ($30–$50) mounts in the rack above the switch — each office drop punches down to a keystone jack, patch cables connect to switch ports, and every run stays labeled and re-patchable without touching the wall runs. The UDM Pro Max-to-switch backbone runs as a direct-attach 10G SFP+ DAC cable, which bypasses the patch panel entirely.
Equipment rack configuration for this Doral office: UDM Pro Max, USW-Pro-HD-24-PoE, and ISP modem on a wall-mount open-frame rack with organized cable runs.
4. Confirm the ISP handoff point during the walkthrough. Not on install day. The demarcation in this Doral office was in the rear equipment corner — straightforward. Buildings with shared telco rooms on a different floor, or ISP-managed routers in a locked cabinet, add time to the install when discovered mid-job. Five minutes during the walkthrough eliminates that risk.
5. Confirm building access control policy before speccing door hardware. Before quoting the G3 Reader and Door Hub, ask the building manager whether tenant-side access control hardware is permitted on the main entry door. This is not a hypothetical concern — it affects a meaningful number of commercial tenant installs, particularly in managed office parks with existing building systems. On this install, the building confirmed there were no restrictions. On others, this conversation changes the scope.
6. Consider cellular failover for professional firms. An accounting practice or legal office loses money by the hour during an internet outage. The UniFi 5G Max ($399) connects to any PoE-enabled LAN port on the USW-Pro-HD-24-PoE, auto-adopts into the UDM Pro Max, and delivers automatic failover to 5G cellular within minutes of detecting a primary WAN failure — no second WAN port required. Configuration is a single toggle in UniFi Network under Settings > Internet. Set a data usage cap to prevent overages. For any professional firm processing transactions or handling time-sensitive client work, the $399 hardware cost is direct insurance against downtime.
Add a UPS to Every Office Build
South Florida's thunderstorm season (June–October) delivers frequent voltage sags and brief outages that can corrupt NVR recordings and reboot networking gear mid-session. A mini-tower UPS on the IT shelf is the right fix.
Spec: The CyberPower CP1500AVRLCD3 (1500VA/900W, ~$200) sits on an IT shelf next to or below the rack, includes AVR to correct minor voltage fluctuations without switching to battery, and provides 12 outlets. At this build's ~150W total draw, the 900W output delivers approximately 30–45 minutes of runtime during a full outage — enough to ride out a typical afternoon storm or shut down cleanly. Plug the UDM Pro Max, USW-Pro-HD-24-PoE, and the ISP modem into the battery-backed outlets.
What Does a Complete UniFi Small Office Build Cost?
Three ways to look at the cost, plus a TCO comparison to subscription-based alternatives:
Hardware only — full build (WiFi + cameras + door access): ~$3,400–$3,700, depending on camera count and whether door access is included. The 5-camera, 1-door-reader configuration shown in this case study — including rack — lands at ~$3,659 at current prices.
WiFi-only (no cameras, no door access): ~$2,076 for gateway + switch + 2 APs. This covers the core networking layer — managed WiFi, guest isolation, VLAN segmentation, remote management — without the security layer. A sensible starting point if cameras and door access are planned for a future phase.
Hardware + professional installation: ~$4,200–$5,100 for a fully pre-wired office. Add $200–$500 per new cable run if drops need to be pulled. This install required two new conference room drops ($300 additional).
DIY in a pre-wired office: Hardware cost + a weekend. UniFi's setup flow is straightforward for someone comfortable with basic networking.
What You're Actually Buying
Unlike a consumer router upgrade, this build covers WiFi, switching, cameras, and door access in a single managed platform — one interface, one app, no third-party integrations required. There's no subscription fee for the core system. UniFi Network, UniFi Protect (with local NVR storage via the onboard HDD bays), and UniFi Access all run locally on the UDM Pro Max without a cloud dependency.
At a 5–8 year hardware lifespan — which is realistic for Ubiquiti gear in a commercial environment — the per-year cost of a fully managed, camera-integrated network with door access works out to roughly $455–$730/year in hardware amortization. That’s the right lens for a business decision, not the day-one hardware number.
How does this compare to subscription-based alternatives?
Enterprise platforms like Cisco Meraki require annual per-device licensing on top of hardware. The Meraki MX67 gateway alone carries a 3-year Advanced Security license of $450–$550 (roughly $167/year) — that's just the security appliance, before adding switch and AP licenses. A comparable Meraki stack covering gateway, PoE switch, and two APs runs $4,000–$6,000 in hardware plus $800–$1,200/year in ongoing subscriptions. Over five years, the total cost of ownership for that Meraki stack reaches $8,000–$12,000 — and it covers none of the cameras or door access included in this UniFi build.
The UniFi build here — WiFi, switching, cameras, door access, and rack — costs $3,659 in hardware with no annual subscription fees. The break-even against a comparable Meraki deployment is well under 24 months.
South Florida Install? Read This First
Provider selection, building infrastructure, and ISP handoff logistics vary significantly across Miami-Dade, Broward, and Palm Beach commercial markets. Our Miami Office IT Planning Guide covers the regional context that changes how you spec and budget these projects — and is the reference for any South Florida consulting engagement.
Related Resources
- 30-Person Office Network Project Plan — Planning a larger installation? This guide covers the full BOM, VLAN design, and timeline for a 30-user professional services office under $5,000.
- UniFi Office Network Design Guide — The planning reference behind this case study. Architecture, VLAN strategy, and design principles for professional UniFi deployments.
- UniFi WiFi 7 APs for Business — Full breakdown of the U7 Pro XG, U7 Pro XG Wall, and the rest of the WiFi 7 lineup for commercial use.
- UniFi Protect Camera System Under $2,000 — Camera-focused case study covering the G6 Turret, G6 Instant, and NVR selection.
- UniFi Access Review — Hands-on review of the UniFi Access door control system, including reader options and hub selection.
- Full UniFi Product Guide — Complete reference for the UniFi ecosystem: gateways, switches, APs, cameras, and access hardware.
- The IT Stack We Deployed for a 10-Person Accounting Firm — The network build here is one layer of a full stack; that article covers identity, password management, backup, and endpoint protection for the same size firm.
- Small Business Network Setup Guide — Platform-agnostic starting point for businesses evaluating their first managed network.
- Miami Office IT Planning Guide — South Florida-specific context: provider selection, building infrastructure, and local installation considerations.
Frequently Asked Questions
Related Articles
More from UniFi Networks
We Ran 538 Ubiquiti Devices for 4 Years. Here's What Actually Failed.
Real fleet data: 538 UniFi devices tracked over 4 years. 0.74% replacement rate, 99.99% core uptime, and five incident post-mortems from commercial sites.
15 min read
UniFi Home Network Upgrade: Cat5e, Cloud Gateway Max, and U7 In-Wall in a 2,500 sq ft House
A residential UniFi installation using the Pro Max 16 PoE switch, Cloud Gateway Max with 512GB storage, and four U7 In-Wall access points — built on existing Cat5e cabling and a 500 Mbps AT&T fiber connection.
12 min read
UniFi Travel Router Review: Purpose-Built Portable Networking for Teams on the Move
In-depth UniFi Travel Router review with real-world field deployment focus. Covers Teleport VPN, camera integration, power bank compatibility, and when to choose the UTR vs Express 7.
18 min read