How to Build a Reliable Guest WiFi Network for Your Business (UniFi + VLAN Setup)
Learn how to set up a secure guest WiFi network with UniFi VLANs. Step-by-step guide for small businesses covering network isolation, captive portals, and security best practices.

Offering guest WiFi is practically a must for modern businesses—whether you run a coffee shop, retail store, medical office, or corporate workspace. But here's the problem: sharing your WiFi with guests without proper isolation is a security risk.
Without network separation, a guest connecting to your WiFi could potentially access your business computers, security cameras, point-of-sale systems, and confidential files. One compromised device on an open network can expose your entire operation.
The solution? VLAN isolation with UniFi. If you are new to VLANs and want to understand the concept first, our VLANs explained guide covers what they are and which segments your business needs. This guide walks through the hands-on setup: creating a completely separate, secure guest WiFi network that gives visitors internet access while keeping your business data protected.
What you'll accomplish in ~20 minutes:
- Set up an isolated guest network that blocks access to your business devices
- Configure professional guest WiFi with optional branding
- Apply security best practices automatically (UniFi does the heavy lifting)
- Test everything to ensure guests get internet, nothing else
Let's get started.
Prerequisites: What You Need
Before diving into the setup, you'll need UniFi equipment with a gateway. The good news? UniFi automatically handles the complex security configuration when you enable "Guest" mode—you're just filling out forms and clicking save.
Think of it like an office building: Your business operates on secure floors (2-10), while guests stay in the lobby. They can access the internet (leave the building), but can't reach your business devices (can't take the elevator upstairs).
Required Equipment
You need any UniFi gateway with UniFi OS:
- Cloud Gateway Ultra — $129
- Dream Machine Pro — $379-455
- Dream Machine Pro Max — $599
- Dream Router 7 — $249-279
Why a gateway? It creates the VLAN isolation between guest and business networks, plus automatically applies firewall rules.
Already have UniFi gear? Skip to the setup section.
Hardware Recommendations by Business Size
| Office Size | Gateway | Access Points | Total Cost | Best For |
|---|---|---|---|---|
| Small (5-15 employees, <2,000 sq ft) | Cloud Gateway Ultra | 1x U6 Lite | ~$228 | Retail shops, small offices |
| Medium (15-50 employees) | Dream Machine Pro | 2-3x U6/U7 Pro | ~$659-1,034 | Multi-room offices, restaurants |
| Large (50+ employees) | Dream Machine Pro Max | 4-6x U7 Pro | ~$1,500+ | Corporate, multi-floor buildings |
For very small offices (<10 employees): Consider the all-in-one Dream Router 7 ($249-279)—gateway and WiFi 7 in one device, no separate access points needed.
Need help choosing? Check our UniFi Gateway Comparison Guide for detailed specs.
Step-by-Step: Create Your Guest Network
UniFi automates the complex parts—you're just filling out a form.
Step 1: Access Network Settings
- Open your UniFi controller at unifi.ui.com (or the local gateway IP address if self-hosted)
- Navigate to Settings → Networks
- Click Create New Network
Step 2: Configure Guest Network
Fill out the form with these settings:
| Setting | Value | Why It Matters |
|---|---|---|
| Network Name | Guest WiFi | Internal label (guests won't see this) |
| Purpose | Guest | CRITICAL — Enables automatic isolation |
| VLAN ID | 40 | Network identifier (industry standard) |
| Gateway/Subnet | 10.40.0.1/24 | IP address range for guest devices |
| DHCP | ✓ Enabled | Auto-assigns IP addresses to guests |
| Client Isolation | ✓ Optional | Prevents guests from seeing each other |
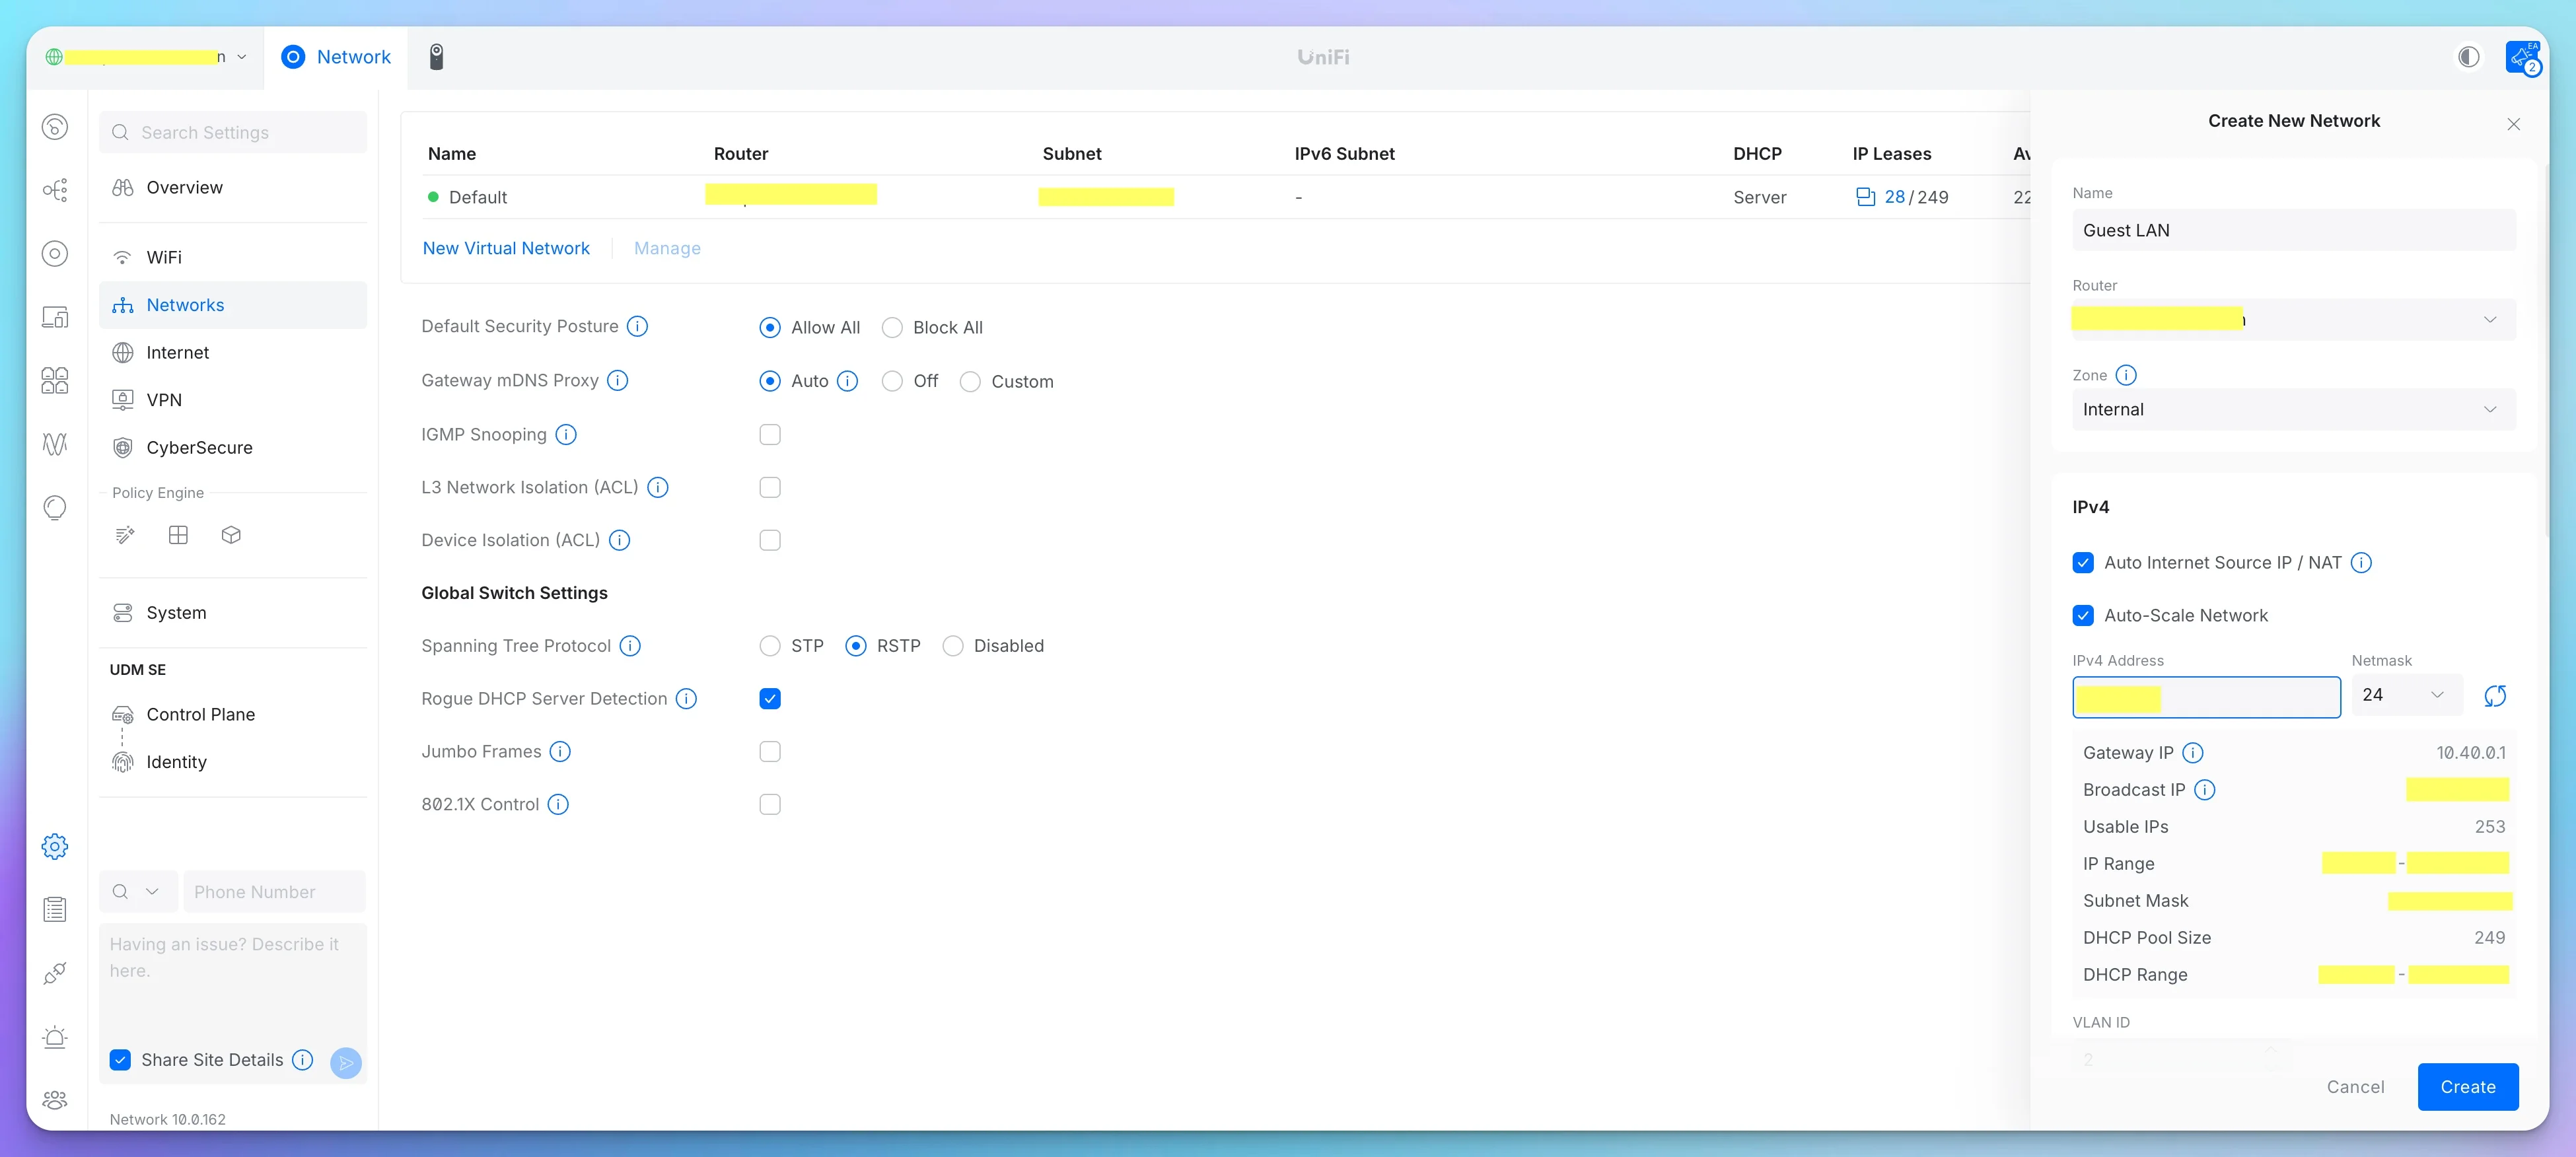
Critical Setting
Purpose: Guest is the most important setting. This single selection tells UniFi to automatically apply firewall rules, VLAN isolation, and security policies.
Step 3: Save and Verify
You'll see a form with several fields. Don't worry—I'll explain each one in plain English.
Network Name:
- Type: Guest WiFi or Guest Network
- What is this? Just a label for you to identify this network in settings
- Guests won't see this—that comes later when we create the WiFi name
Purpose: SELECT "GUEST" ← This is the most important setting
- Find the "Purpose" dropdown and select "Guest"
- What happens: This one setting tells UniFi to keep this network completely separate from everything else
- UniFi automatically applies security rules when you select "Guest"—you don't need to manually configure firewall rules
VLAN ID:
- Enter: 40
- What is this? It's like an address tag for this network zone
- Why 40? Industry standard, easy to remember, leaves room for future networks
- Do I need to understand VLANs? Nope—just enter 40 and move on
Gateway/Subnet (The IP Address Stuff):
- Enter: 10.40.0.1/24
- What does this mean? It's the "address range" for guest devices
- Translation: Guests get IP addresses like 10.40.0.100, 10.40.0.101, etc.
- Why does this matter? This is how UniFi knows they're guests (not employees)
DHCP Enabled:
- Leave this box checked (on)
- What it does: Automatically assigns IP addresses to guest devices
- If you turn it off: Guests can't connect (they won't get an IP address)
Optional: Network Isolation
- This is an extra security checkbox—you can skip it for now
- What it does: Prevents guests from even pinging each other
- Recommended for: Coffee shops, waiting rooms, any public space where privacy matters
Step 4: Save and You're Done
- Click Add Network or Save
- That's it! Your guest network exists now
Next step: Create the WiFi name that guests will actually see and connect to.
What Just Happened Behind the Scenes?
When you clicked Save, UniFi automatically configured:
✓ Firewall rules blocking access to your business devices
✓ Separate IP address pool for guests (10.40.0.x range)
✓ Internet access allowed, local network access denied
✓ DHCP server to assign addresses automatically
You didn't have to configure any of that manually—selecting "Guest" did all the heavy lifting.
Confidence Check: Wait, That's It?
Yep, that's the beauty of UniFi! The complex networking stuff (firewall rules, routing, subnet management) happens automatically. You're just telling UniFi what you want ("a guest network"), and it handles all the technical implementation behind the scenes.
What you just avoided manually configuring:
- Firewall rules blocking RFC1918 private addresses
- Inter-VLAN routing policies
- DHCP server for the guest subnet
- NAT rules for internet access
All of that? UniFi did it when you clicked "Save."
Your guest network exists, but guests can't see it yet. Let's create the WiFi name they'll connect to.
Step-by-Step: Configure Guest WiFi
What you're doing now: Creating the WiFi network name (SSID) that guests will see when they search for WiFi on their phones.
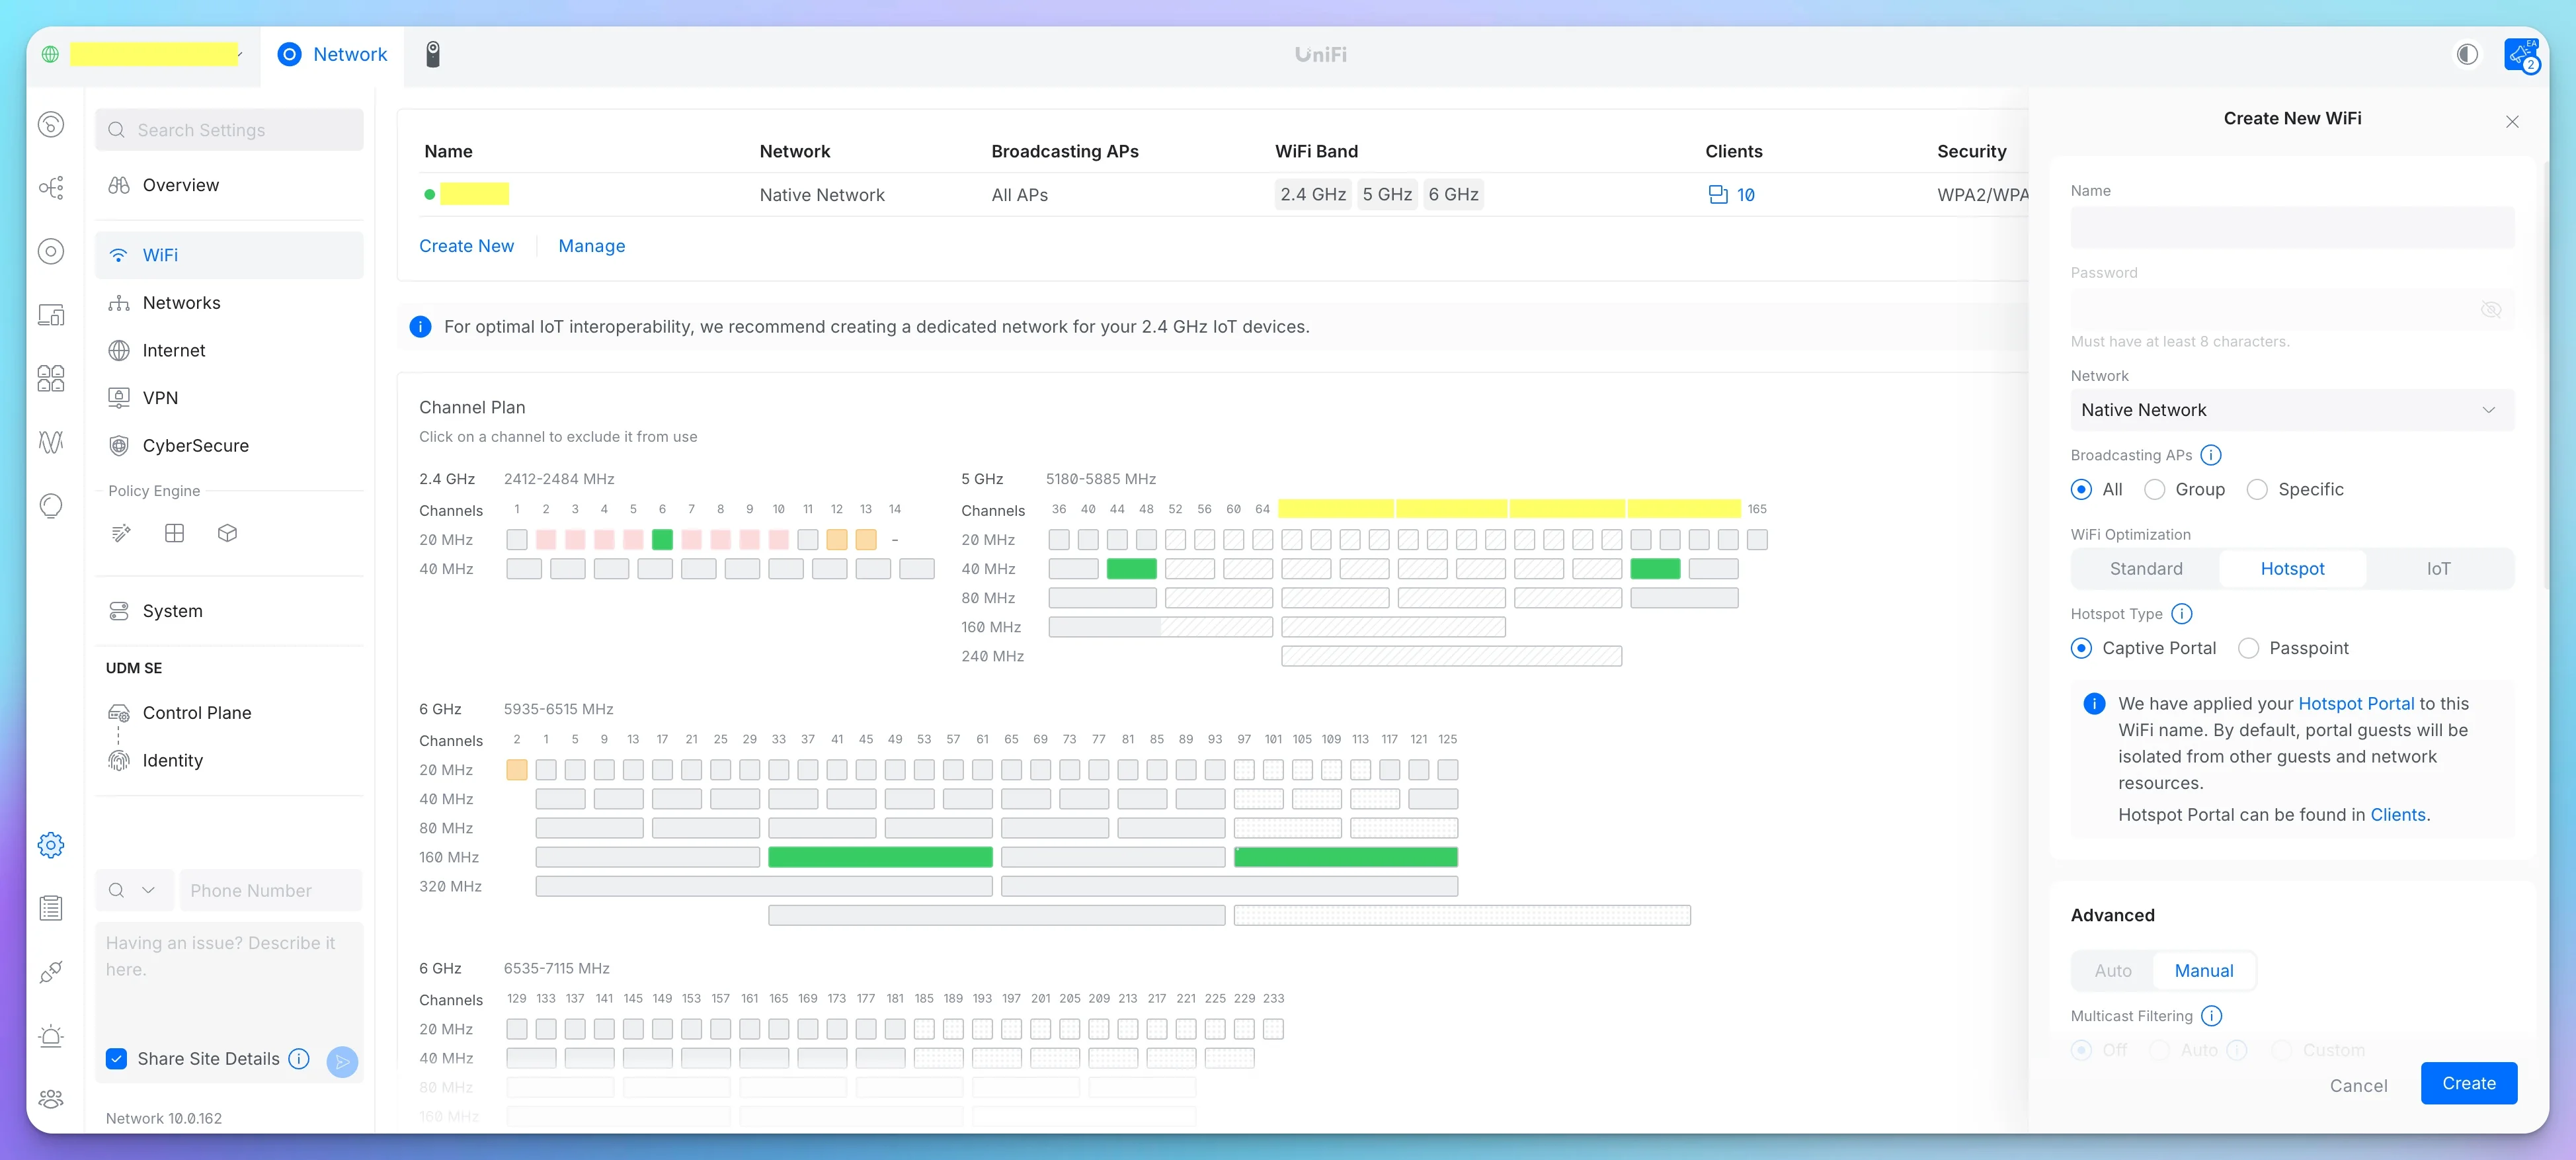
Step 1: Navigate to WiFi Settings
In the UniFi Controller:
- Go to Settings → WiFi
- Click Create New WiFi Network
Step 2: Name Your Guest WiFi
WiFi Name (SSID):
- Enter something like: YourCompany-Guest or Guest-WiFi
- Guests will see this name when they search for available networks
- Tip: Make it obvious it's for guests (don't use your main business WiFi name)
Example good names:
- "Cafe Guest WiFi"
- "Office Visitors"
- "[YourCompany] Guest"
Avoid:
- "Free WiFi" (security risk—attracts everyone in the area, including people parked outside)
- Same name as your business WiFi (too confusing)
Step 3: Security Settings (Keep It Simple)
Password Protection:
- Security Protocol: Leave as WPA2/WPA3 Personal (the default is fine)
- Password: Create a simple password you can share with guests
- Example: "GuestWiFi2026" or "WelcomeGuests"
- Write it on a sign, business cards, or tell customers directly
- Don't make it too complex—guests need to type it on their phones in under 10 seconds
OR Skip Password (If Using Captive Portal):
- If you want a branded splash page instead (covered in the next section), you can leave this open
- You'll collect info through the portal instead of a password
Step 4: Connect to Your Guest Network (The Critical Part)
Network Dropdown:
- Select: "Guest WiFi" or "Guest Network" (the network you created in the previous section)
- This is critical—this connects the WiFi name to the isolated network
- If it's not connected to the guest network, isolation won't work
If you don't see your guest network in the dropdown:
- Go back and make sure you completed the "Create Guest Network" section
- Try refreshing the page
- Make sure you clicked "Save" on the network creation
Step 5: Enable Guest Protection Features
You'll see a few checkboxes—enable these two:
"Guest Policy" or "Guest Hotspot":
- ✓ Check this box
- What it does: Adds extra security restrictions automatically
- UniFi handles: Blocks access to local devices, allows internet only
- This is a second layer of protection (in addition to the "Purpose: Guest" setting)
"Client Device Isolation":
- ✓ Check this box
- What it does: Guests can't see each other's phones, laptops, or tablets
- Why it matters: Privacy for your guests, extra security for you
- Example: Two customers can't AirDrop malicious files to each other
Step 6: Speed Limits (Optional But Recommended)
Why limit speeds?
- Prevents one guest from using all your bandwidth (someone downloading a 50GB file)
- Keeps your business operations smooth (POS, VoIP, video calls)
- Fair usage for all guests
How to set up bandwidth limits:
- In the WiFi settings, find Bandwidth Profile dropdown
- Click Create New Profile (if you don't have one already)
- Set reasonable limits:
- Download: 10-20 Mbps (plenty for browsing, email, social media, even video streaming)
- Upload: 5-10 Mbps (enough for video calls and uploading photos)
- Give it a name like "Guest Bandwidth"
- Apply this profile to your guest WiFi
Real-world example:
- Your business has 500 Mbps internet connection
- You limit each guest to 15 Mbps
- 10 guests online = 150 Mbps total for guests
- Still leaves 350 Mbps for your business operations
Step 7: Save and Test
- Click Add WiFi Network or Save
- Your guest WiFi is now live!
Quick test:
- Grab your phone
- Open WiFi settings
- Look for your guest network name
- Connect with the password
- Open a browser—you should get internet access ✓
Verification test (important):
- While connected to guest WiFi, try to access your business computer by typing its local IP address in a browser
- Expected result: Connection should fail or time out
- This proves the isolation is working
Quick Win!
Your guest WiFi is now live and secure. Guests can browse the internet, but they're completely isolated from your business network. If you're happy with a simple password-based setup, you're done! The captive portal below is optional.
Optional: Captive Portal Setup
A captive portal is the splash page that appears when guests connect to WiFi—like you see at hotels, airports, and coffee shops. It's optional, but adds professionalism and helps with compliance if you need to track usage.
When to Use a Captive Portal
Good use cases:
- Customer-facing businesses (retail, hospitality, healthcare)
- You want to collect email addresses for marketing (with permission)
- GDPR/CCPA compliance tracking
- Professional branding (custom splash page with your logo)
- Need guests to accept terms of service
Skip the portal if:
- Very small office with known guests (just use a password)
- You prefer simplicity (password on a sign works great)
- No compliance requirements
Configure the Guest Portal
Step 1: Enable Guest Control
- Settings → Guest Control → Enable Hotspot Portal
Step 2: Choose Authentication Method
None / Click-through:
- Guests just click "I Accept" and get access
- Simplest option
Simple Password:
- Single shared password shown on the portal page
- Good middle ground between security and convenience
Voucher System:
- Generate time-limited access codes
- Great for paid access or temporary visitors
External Portal:
- Integrate with third-party systems
- Advanced option for enterprise
Step 3: Customize Your Portal
Upload Your Logo:
- Recommended size: 300x150px
- PNG or JPG format
- Shows at the top of the splash page
Set Your Colors:
- Background color: Match your brand
- Button color: Use your brand's primary color
Welcome Message:
- Example: "Welcome to [Your Company]! Enjoy complimentary WiFi."
- Keep it short and friendly
Terms of Service:
- Link to your privacy policy (required for GDPR compliance if collecting data)
- Example: "By connecting, you agree to our privacy policy"
Step 4: Session Settings
Access Duration:
- Set how long guests stay connected before needing to re-authenticate
- Recommended: 4-8 hours (balances convenience with security)
Bandwidth Limits:
- Can also be set here (or in the WiFi settings we covered earlier)
Step 5: Optional Redirect
Redirect URL (Optional):
- After authentication, send guests to your website
- Great for marketing, but don't be pushy—guests just want WiFi
- Consider skipping this to avoid annoying customers
Step 6: Save and Test
- Save your guest control settings
- Connect a test device to guest WiFi
- Expected behavior: Browser automatically opens the splash page
- Complete the portal, confirm you get internet access
Best practice: Keep the portal simple—minimal fields, clear branding, quick access. The faster guests get online, the happier they'll be.
Testing Your Guest Network
Before you call it done, let's verify everything works correctly. This takes 5 minutes and ensures your business stays protected.
Test 1: Basic Connectivity
Steps:
- Connect a test device (your phone or laptop) to the guest WiFi
- Enter the password or complete the captive portal
- Open a browser and go to google.com or any external site
Expected result: Internet access works ✓
If it fails: Check that DHCP is enabled in the guest network settings
Test 2: Network Isolation (Critical Security Test)
This is the most important test—verifying guests can't access your business devices.
Steps:
- While connected to guest WiFi, try to access your business computer
- Open a browser
- Type your business computer's IP address (e.g., 10.10.0.5)
- Or try to access a network printer, security camera, or server
- Try pinging an internal device:
- Open Command Prompt (Windows) or Terminal (Mac)
- Type: ping 10.10.0.1 (use your actual business network IP)
Expected result: All attempts should FAIL or timeout ✓
What this proves: The VLAN isolation is working—guests can't see your business network
Security Issue Detected
If guests CAN access internal devices: Your network isn't properly isolated. This is a security issue.
Fix immediately:
- Verify "Purpose: Guest" is selected in network settings
- Enable "Guest Policy" in WiFi settings
- Confirm WiFi is assigned to guest network (not your main network)
- Provision your access points to apply changes
Test 3: Client Device Isolation
Steps:
- Connect two devices to guest WiFi (two phones or a phone + laptop)
- Find the IP address of Device A (usually in WiFi settings)
- From Device B, try to ping Device A's IP address
- Terminal/Command Prompt: ping 192.168.40.100 (use actual IP)
Expected result: Ping should fail (if you enabled Client Device Isolation) ✓
What this proves: Guests can't communicate with each other—good for privacy and security
Test 4: Bandwidth Limits
Steps:
- Run a speed test on guest WiFi (visit speedtest.net)
- Check download and upload speeds
Expected result:
- Download speed should cap at your configured limit (e.g., 15 Mbps) ✓
- Upload speed should cap at your upload limit (e.g., 5 Mbps) ✓
What this proves: Bandwidth limits are working—one guest can't saturate your connection
Test 5: Captive Portal (If Enabled)
Steps:
- Connect a fresh device to guest WiFi (or forget the network and reconnect)
- Open a browser in incognito/private mode (important—clears cache)
- Try to access any website
Expected result:
- Browser automatically redirects to your splash page ✓
- After completing the portal (accepting terms, entering password, etc.), you get internet access ✓
If portal doesn't appear:
- Try accessing an HTTP site (not HTTPS): http://captive.apple.com
- Clear browser cache
- Verify Guest Control is enabled in settings
Monitoring Guest Usage
Where to check:
- UniFi Controller → Insights → WiFi
- Filter by your guest WiFi name
- View:
- Current connected clients
- Bandwidth usage (real-time graphs)
- Session durations
- Top bandwidth consumers
Set up alerts:
- Settings → Alerts → Create rules for:
- More than X simultaneous guest connections
- High bandwidth usage on guest network
- Failed authentication attempts
If all tests pass, congrats! Your guest WiFi is secure and working. If something failed, check the troubleshooting section below.
Troubleshooting Common Issues
Issue: "Guests Can't Connect to WiFi"
Symptoms: Devices see the network but can't connect, or connection fails immediately.
Possible causes & fixes:
VLAN not assigned properly:
- Edit your guest WiFi → verify Network dropdown is set to "Guest Network"
- Save and try again
DHCP not enabled:
- Settings → Networks → Guest Network
- Make sure DHCP checkbox is enabled
- Save changes
Password incorrect:
- Double-check your WPA2/3 password
- Try resetting it to something simple to test
- Make sure caps lock isn't on when guests enter it
Access point not adopting changes:
- Go to Devices → select your access point
- Click Provision to force it to update settings
- Wait 30 seconds and try connecting again
Issue: "Slow Guest WiFi Speeds"
Symptoms: Guests complain about slow internet, buffering, or timeouts.
Possible causes & fixes:
Bandwidth limits too restrictive:
- Check your bandwidth profile settings
- 10+ Mbps is usually enough for browsing and streaming
- Increase if needed (Settings → Profiles → Bandwidth Profiles)
Too many clients on one access point:
- Check how many devices are connected (Devices → AP → Clients)
- If >50 clients on one AP, consider adding more APs
- Enable band steering to balance 2.4 GHz and 5 GHz usage
Poor AP placement:
- Run a WiFi scan (UniFi app → WiFi AI)
- Relocate AP to a more central location
- Check for interference from other WiFi networks
Internet connection saturated:
- Check overall WAN usage (Insights → Internet)
- If your business + guests = 100% bandwidth, upgrade your internet plan
- Or lower guest bandwidth limits to prioritize business traffic
Issue: "Guests Can Access Internal Network"
Symptoms: Isolation test fails—guests can ping business devices or access internal resources.
Critical Security Issue
This is a critical security issue. If guests can access your internal network, your business data is at risk. Fix this before allowing guests to connect.
Possible causes & fixes:
Guest policy not enabled:
- Edit guest WiFi → verify "Guest Policy" or "Guest Hotspot" is checked
- Save and test again
Network purpose not set to Guest:
- Settings → Networks → Guest Network
- Verify Purpose = "Guest"
- If it's set to "Corporate" or anything else, change it to "Guest"
- Save and provision your access points
Custom firewall rules interfering:
- Settings → Firewall & Security → Firewall Rules
- Check LAN In rules for anything allowing guest network traffic
- Remove or disable conflicting rules
Same subnet as corporate network:
- If your guest network uses the same IP range as your business (e.g., both 192.168.1.x), they're not isolated
- Change guest network to a different subnet (e.g., 10.40.0.1/24)
Issue: "Captive Portal Not Appearing"
Symptoms: Guests connect to WiFi but don't see the splash page.
Possible causes & fixes:
Browser cached old page:
- Clear browser cache
- Use incognito/private browsing mode to test
- Try a different browser
Guest Control not enabled:
- Settings → Guest Control
- Verify Hotspot Portal is enabled
- Make sure the portal is assigned to your guest WiFi
HTTPS sites bypass portal:
- Modern browsers default to HTTPS, which can skip captive portals
- Try accessing an HTTP site: http://neverssl.com or http://captive.apple.com
- These sites force the redirect
DNS issues:
- Settings → Networks → Guest Network
- Verify DNS is set to gateway IP or auto
- Save and test again
Getting Professional Help
Still having issues?
- UniFi Community Forums: https://community.ui.com/ (very active, helpful community)
- Official Documentation: https://help.ui.com/ (searchable knowledge base)
- Professional Installation: Contact our Miami IT team for expert setup and support
Need Professional Help?
Complete network deployment services:
- UniFi network design and installation
- Custom VLAN configuration for complex environments
- UniFi Protect camera integration
- Ongoing monitoring and support
Serving: Miami, Coral Gables, Brickell, Doral, and South Florida
Security Best Practices Checklist
Now that your guest WiFi is running, let's make sure it stays secure.
Pre-Deployment Security (Do This Once)
- Enable WPA2/WPA3 encryption (WPA3 with WPA2 fallback for older devices)
- Set a strong WiFi password (12+ characters, mix of letters/numbers)
- Assign unique VLAN ID (40 recommended—never use VLAN 1)
- Enable "Guest" network purpose (auto-applies firewall rules)
- Enable client device isolation (guests can't see each other)
- Configure bandwidth limits (10-20 Mbps download, 5-10 Mbps upload)
- Test network isolation (verify guests can't access business devices)
Ongoing Security Maintenance (Do This Regularly)
Quarterly tasks:
- Change guest WiFi password (or monthly for high-traffic businesses)
- Review guest firewall rules
- Settings → Firewall & Security → check "Guest In" rules
- Verify private IP ranges are blocked (10.0.0.0/8, 172.16.0.0/12, 192.168.0.0/16)
- Update UniFi firmware (Settings → System → Update)
- Enables latest security patches
- Check release notes for new features
Weekly tasks:
- Monitor guest network usage
- Check for unusual bandwidth spikes
- Review connected device count (sudden surge could indicate abuse)
- Look for non-standard devices (servers, mining rigs, etc.)
Advanced Security (Optional)
For higher security requirements:
- Implement voucher system for temporary guest access (instead of password)
- Set session time limits (auto-disconnect after 4-8 hours)
- Enable content filtering (Settings → Internet Security → Threat Management)
- Block malicious sites, ads, trackers
- Consider blocking torrents, P2P, gambling
- Configure custom DNS filtering (block known malware/phishing domains)
- Set up traffic alerts (notify when >50 concurrent guests or high bandwidth)
Compliance Checklist (GDPR/CCPA)
If you collect guest data through captive portal:
- Captive portal displays privacy policy (visible link before connection)
- Terms of service acceptance required (checkbox or click-through)
- Guest session logs retained for required duration (typically 90-180 days depending on industry)
- Data deletion policy implemented (auto-purge old logs after retention period)
- Consent is explicit (pre-checked boxes don't count under GDPR)
If you just provide a password (no data collection): You can skip the compliance section.
Frequently Asked Questions
Do I need a separate internet connection for guest WiFi?
No. Guest WiFi uses the same internet connection as your corporate network. The VLAN isolation happens at the router/gateway level, not at your ISP.
You're essentially dividing your existing bandwidth between corporate and guest traffic using:
- Bandwidth limits (to cap guest speeds)
- Quality of Service (QoS) to prioritize business traffic
Exception: Very high-traffic businesses (hotels, convention centers, large waiting rooms with 100+ guests) may benefit from a dedicated guest internet line for performance reasons. But for 99% of small businesses, one internet connection is fine.
Can guests see each other's devices?
Not if you enable Client Device Isolation.
When you check the "Client Device Isolation" box in guest WiFi settings, UniFi prevents devices on the same guest network from communicating with each other. This stops:
- Unauthorized file sharing between guests
- Lateral attacks if one device is compromised
- Privacy violations in public spaces
To verify it's working: Try pinging one guest device from another—it should fail.
How many simultaneous guest connections can I support?
It depends on your gateway:
| Gateway | Max Guest Capacity |
|---|---|
| Cloud Gateway Ultra or Dream Router 7 | ~100-150 guests |
| Dream Machine Pro | ~300-500 guests |
| Dream Machine Pro Max | ~1,000+ guests |
Real bottleneck: Usually your internet bandwidth, not the hardware.
Example calculation:
- You have 500 Mbps internet
- Each guest gets 10 Mbps (your bandwidth limit)
- 500 ÷ 10 = 50 guests at full speed
Beyond that: Guests share bandwidth, so speeds drop proportionally. For most small businesses, 20-50 concurrent guests is typical.
What if I don't have a UniFi gateway?
VLAN isolation requires a managed router/gateway.
If you're using a third-party router:
- Create a guest VLAN on your router (if it supports VLANs)
- Configure UniFi controller to use that VLAN ID
- Limitations: Guest policies may not work fully—you'll need to manually configure firewall rules
Better option: Consider adding a UniFi Cloud Gateway Ultra ($129):
- Much easier setup (automatic guest policies)
- Better integration with UniFi ecosystem
- Future-proof for adding cameras, more APs, etc.
For a complete guide on UniFi network setup, see our UniFi Business Network Guide.
Should I enable content filtering for guest WiFi?
Recommended for:
- Schools, libraries, family-friendly businesses
- Legal liability concerns (blocking illegal content)
- Bandwidth preservation (blocking video streaming, torrents)
How to enable:
- Settings → Internet Security → Threat Management
- Select categories to block:
- Adult content
- Gambling
- Torrents and P2P
- Proxy/VPN services (prevents filter bypass)
Note: Savvy users can still bypass filtering using VPNs, so it's not foolproof. But it reduces casual abuse and protects your business from liability. The optional CyberSecure subscription ($99/year) expands filtering to 100+ categories with per-VLAN policies and real-time threat intelligence.
How do I monitor guest network usage?
Real-time monitoring:
- UniFi Controller → Insights → WiFi
- Filter by your guest WiFi name
- View:
- Current connected clients
- Bandwidth usage graphs
- Top bandwidth consumers
- Average session duration
Set up proactive alerts:
- Settings → Alerts → Create New Alert
- Alert types:
- \u003e X simultaneous connections (e.g., alert if >50 guests)
- High bandwidth usage (e.g., alert if guest network exceeds 200 Mbps)
- Failed authentication attempts (possible security issue)
Export reports:
- Insights → Export to CSV for monthly usage reports
- Useful for capacity planning ("Do we need more APs?")
Next Steps & Professional Help
Congratulations! You've successfully set up a secure, isolated guest WiFi network using UniFi. Your guests now have convenient internet access while your business data stays protected behind automatic firewall rules.
Key Takeaways
✓ VLANs provide network-level isolation between guest and corporate traffic
✓ UniFi's "Guest" purpose auto-applies firewall rules—no manual configuration needed
✓ Client device isolation prevents guest-to-guest communication
✓ Bandwidth limits prevent network saturation
✓ Regular monitoring and password updates maintain security long-term
Expand Your UniFi Network
Want to do more with UniFi?
- UniFi Business Network Setup Guide — Complete UniFi deployment from scratch
- Small Business Network Security Audit — Comprehensive security review
- UniFi Gateway Comparison Guide — Choosing the right gateway for your business
- Power over Ethernet Guide — Understanding PoE for UniFi APs
- Best WiFi 7 Access Points — Future-proof your WiFi
Security & Compliance:
- Network Security Audit Guide — Beyond just guest WiFi
- Best Cybersecurity Software for Small Business — Layered security approach
Professional Installation & Support
Building a guest WiFi network is straightforward with UniFi, but larger deployments benefit from professional planning—especially if you're:
- Deploying across multiple floors or buildings
- Integrating UniFi Protect security cameras
- Need custom VLAN configurations for departments
- Want ongoing monitoring and support
iFeeltech Miami IT Services offers:
- Complete UniFi network design and installation
- Custom VLAN configuration for complex environments
- UniFi Protect camera integration
- Ongoing network monitoring and support
- Emergency IT support
Locations we serve: Miami, Coral Gables, Brickell, Doral, and South Florida
Schedule a free consultation →
Talk to IT ExpertsConsider Adding UniFi Protect Security Cameras
Now that you have a UniFi gateway, adding UniFi Protect cameras is seamless:
- UDM Pro / Pro Max include built-in NVR storage (no separate recorder needed)
- Cameras integrate directly with UniFi Controller (one management interface)
- AI-powered motion detection, person/vehicle recognition, and instant alerts
- Watch footage from anywhere via mobile app
Popular camera configs for businesses:
- Retail: G6 Bullet cameras covering entrances, cash registers, and aisles
- Office: G6 Instant WiFi cameras for reception and common areas
- Warehouse: G6 Pro cameras with night vision for loading docks
Learn more about UniFi Protect for business security →
Explore UniFi CamerasRelated Reading
- How to Find Your Router IP Address — Access your gateway on Windows, Mac, iPhone, Android, or Linux
- UniFi Protect CCTV Guide — Adding security cameras to your UniFi network
- Double NAT: How to Detect and Fix It — Troubleshooting gateway and subnet conflicts
Have questions or need help with your setup? Drop a comment below or contact our Miami IT team for personalized assistance.
Affiliate Disclosure: This article contains affiliate links. If you make a purchase through these links, we may earn a small commission at no extra cost to you.
Related Articles
More from Network Infrastructure

How to Set Up Guest Wi-Fi the Right Way (And Why Most Businesses Get It Wrong)
Step-by-step guide to setting up a secure guest Wi-Fi network for your small business on UniFi or TP-Link Omada — without exposing your printers, payment terminals, or internal files.
18 min read

VLANs Without the Jargon: What They Are, What to Separate, and Why It Matters
A plain-language guide to VLANs for small business owners. Understand what network segments you already need — guest WiFi, IoT cameras, VoIP phones — and what belongs in each one.
10 min read
Planning a 30-Person Office Network: A Complete Project Guide (Under $5,000)
How we plan a 30-person office network installation — real BOM, VLAN design, timeline, and honest budget breakdown. A practitioner's project guide for medium-office IT.
16 min read