Synology Snapshots Explained: Complete 2026 Guide with Immutable Protection
Master Synology Snapshots for enterprise-grade NAS protection. Learn how to enable Immutable Snapshots (WORM), configure DSM 7.2+ features, and implement immutable defense strategies with Btrfs file systems.

Affiliate Disclosure: This article contains affiliate links. If you make a purchase through these links, we may earn a small commission at no extra cost to you.
Synology Snapshots provide instant point-in-time recovery for NAS data, protecting against accidental deletion, ransomware encryption, and file corruption. Unlike traditional backups that copy entire datasets, snapshots use Btrfs copy-on-write technology to track only the changes, making them near-instantaneous and storage-efficient.
The industry standard for business environments is Immutable Snapshots (WORM - Write Once, Read Many), standardized in DSM 7.2. This prevents even administrators—or compromised admin accounts—from deleting snapshots for a defined retention period, providing ransomware-resistant protection that is now mandatory for enterprise deployments.
This guide covers everything from basic snapshot configuration to advanced immutable protection and off-site replication strategies. If you're evaluating NAS options, see our Synology NAS Business Guide for model comparisons.
Key Takeaways
| Key Concept | Takeaway |
|---|---|
| Purpose | Point-in-time recovery system using Btrfs copy-on-write technology for instant file restoration |
| Critical Feature | Immutable Snapshots (WORM) prevent deletion for set periods, blocking ransomware attacks that target backup systems |
| Requirements | Btrfs file system, Snapshot Replication app, DSM 7.2+ for immutability features |
| Recovery Methods | Self-service via #snapshot folder, single-file admin restore, or full folder rollback |
| Best Practices | Enable immutability with 7-14 day protection periods, use GFS retention (24 hourly, 7 daily, 4 weekly), replicate to second NAS for disaster recovery |
| vs. Backups | Snapshots = same volume, instant recovery. Backups = separate location, disaster protection. Both required for 3-2-1 strategy |
How Do Synology Snapshots Work?
Synology Snapshots use Btrfs copy-on-write technology to create point-in-time reference markers of your data. Unlike full backups, they take up near-zero storage space initially and only consume space when files are modified or deleted.
Under the hood, Synology Snapshots leverage the Btrfs file system's "Copy-on-Write" (CoW) architecture. When you create a snapshot, the NAS doesn't duplicate the data; it simply records the state of the metadata at that exact moment.
If you edit a 10GB video file, the system only saves the changed bits (deltas) rather than rewriting the entire 10GB. This makes snapshots near-instantaneous and extremely storage-efficient, allowing you to keep thousands of versions without overwhelming your drives.
Example: How CoW Works in Practice
- Initial snapshot: Takes <1 second, uses ~0MB (just metadata)
- Edit 100MB of a 10GB file: Next snapshot stores only the 100MB delta
- Delete the file: Original data preserved in snapshot until retention expires
- 1000 snapshots: Typically use <5% of total volume space
Performance Note
Heavy snapshot use on HDDs can increase seek times due to fragmentation. This is particularly noticeable with high-transaction databases or VMs running on spinning drives. SSDs mitigate this issue significantly.
Critical Requirement: Immutable Snapshots
For ransomware-resistant protection, you must enable Immutable Snapshots. This prevents snapshots from being deleted for a set period (e.g., 7 or 14 days), even if attackers gain admin access to your NAS. Without immutability, sophisticated ransomware will delete your snapshots before encrypting your data.
What Are Immutable Snapshots (WORM)?
Immutable Snapshots create a Write Once, Read Many (WORM) state that prevents deletion for a defined period, even by administrators. This is the primary defense against ransomware attacks that target backup systems.
Standardized in DSM 7.2, Immutable Snapshots address a critical vulnerability: traditional snapshots can be deleted by anyone with admin privileges. When ransomware gains admin access (through credential theft or privilege escalation), it typically:
- Deletes all snapshots and backups
- Encrypts the live data
- Demands ransom
How Immutability Blocks This Attack
With immutable snapshots configured for a 7-day protection period:
- Day 1: Ransomware infects the system and gains admin access
- Day 1: Attacker attempts to delete snapshots → BLOCKED by WORM protection
- Day 1: Attacker encrypts live data
- Day 1: You discover the attack and roll back to a snapshot from 2 hours ago
- Result: Zero data loss, minimal downtime
Best Practice: Immutability Periods
Set immutability periods based on your detection capabilities:
- 7 days: Minimum recommended
- 14 days: Recommended for most organizations
- 30 days: High-security environments or compliance requirements
Longer periods provide more recovery options but consume more storage space.
Important Distinction: Synology offers two protection types:
- Snapshot Locking: Prevents retention policy from auto-deleting snapshots (can still be manually deleted by admin)
- Immutability (WORM): Prevents all deletion attempts, even by administrators, until the protection period expires
Always use Immutability for ransomware defense, not just locking.
Compliance & Enterprise Use
Immutable Snapshots meet regulatory requirements for:
- FINRA (financial services)
- HIPAA (healthcare)
- SEC Rule 17a-4 (securities)
- GDPR (data protection)
This makes Synology NAS systems viable for industries that previously required dedicated WORM appliances.
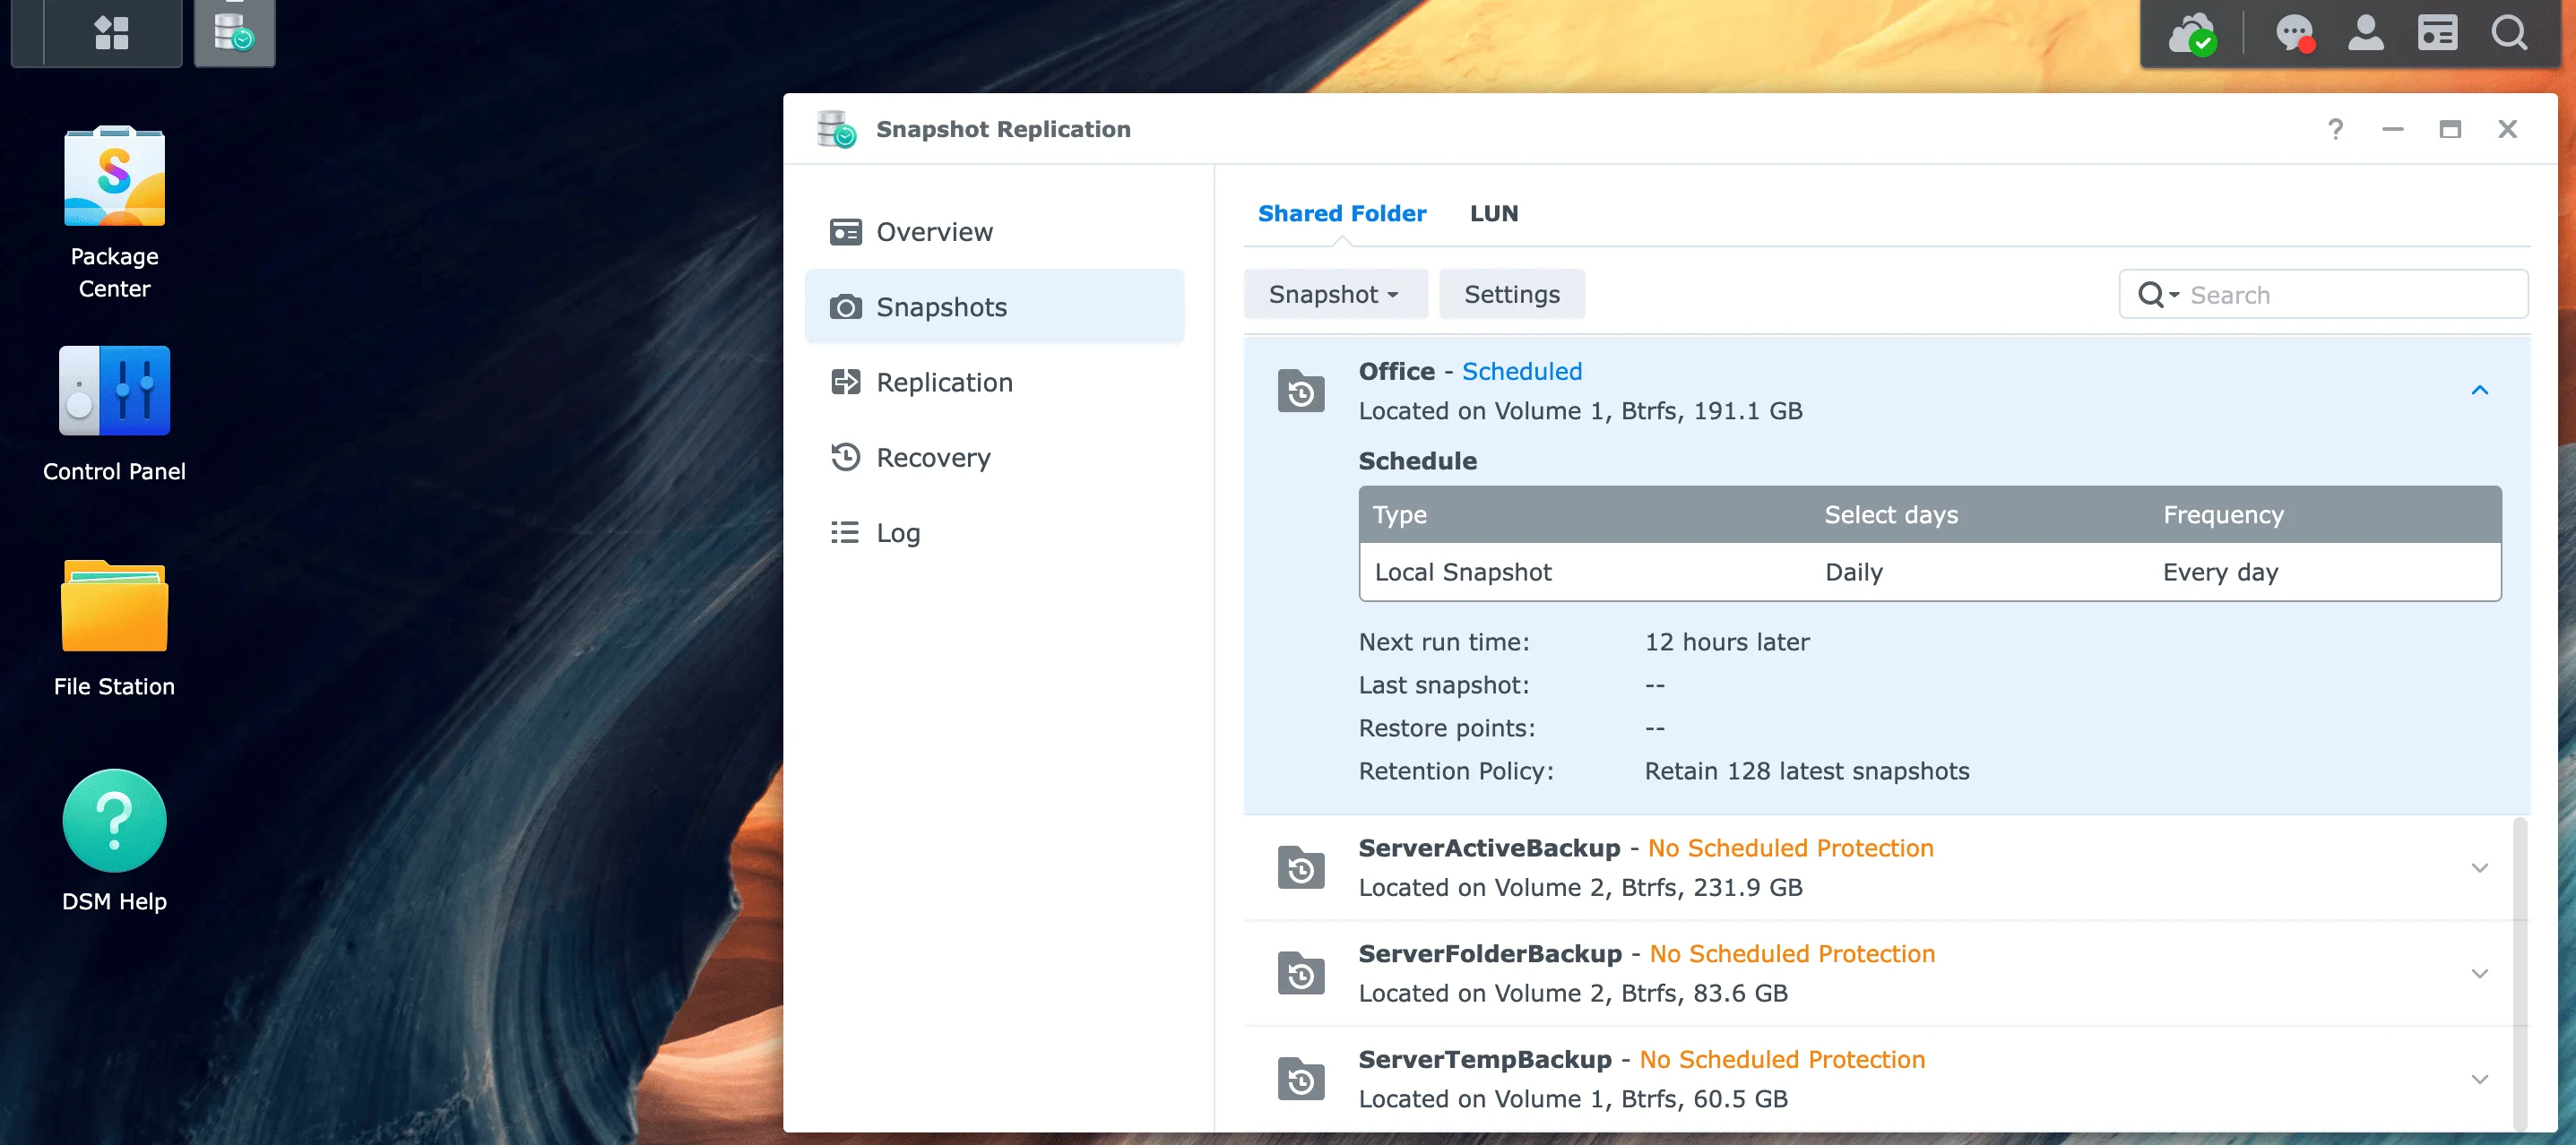
How Do I Enable Synology Snapshots?
Install the "Snapshot Replication" package from the Package Center. Open the app, navigate to "Snapshots," select a Shared Folder, click "Settings," and check "Enable Snapshot Schedule." Ensure your volume is formatted as Btrfs.
Snapshots require the Snapshot Replication package (standard on all Plus-series models and above). If you're looking for a reliable NAS with Btrfs support, the Synology DS925+ is the current 4-bay flagship model, while the DS923+ offers excellent value for small businesses.
Step 1: Verify Prerequisites
-
Check File System: Ensure your volume uses Btrfs
- Go to Control Panel > Storage Manager
- Select your volume and verify "File System: Btrfs"
- Snapshots do not work on EXT4 volumes
- Critical: Migrating from EXT4 to Btrfs requires a full volume format (complete data wipe). You must backup all data first, format the volume as Btrfs, then restore. There is no in-place conversion.
-
Verify DSM Version: For immutable snapshots, you need DSM 7.2 or later
- Go to Control Panel > Info Center
- Check DSM version under "System"
Step 2: Install Snapshot Replication
- Open Package Center
- Search for "Snapshot Replication"
- Click Install
- Launch the app after installation
Step 3: Configure Snapshot Schedule
- In Snapshot Replication, go to Snapshots tab
- Select a Shared Folder from the list
- Click Settings button
- Check "Enable Snapshot Schedule"
Recommended Schedule Settings:
| Data Type | Frequency | Retention Policy (GFS Method) |
|---|---|---|
| Active Documents | Every hour | 24 hourly, 7 daily, 4 weekly |
| Databases | Every 15-30 min | 48 half-hourly, 7 daily, 4 weekly ⚠️ |
| Archives | Daily | 7 daily, 4 weekly, 12 monthly |
| User Home Folders | Every 2 hours | 12 bi-hourly, 7 daily, 4 weekly |
Step 4: Enable Immutable Snapshots (CRITICAL)
-
In the same Settings window, go to Advanced tab
-
Check "Enable Immutable Snapshots"
-
Set Protection Period:
- 7 days: Minimum recommended
- 14 days: Standard for most businesses
- 30 days: High-security environments
-
Click OK to save
Important: Immutability Constraints
Once you enable immutable snapshots with a protection period, you cannot disable it or reduce the period until existing snapshots expire. This is by design—it prevents attackers from simply turning off the protection.
Exception: Immutability is volume-level protection. If you delete the entire Storage Pool/Volume, the immutable snapshots are also destroyed. Immutability protects against snapshot deletion, not physical drive destruction or volume formatting.
Step 5: Make Snapshots Visible to Users (Optional)
This feature allows non-technical users to recover their own files without IT assistance:
-
In Settings > Advanced tab
-
Check "Make snapshot visible"
-
Choose visibility option:
#snapshot(recommended): Creates a visible folder in network shares.snapshot(hidden): Requires users to manually type the path
-
Enable "Allow users to access snapshot" for self-service recovery
Storage Capacity Planning
Rule of thumb: Allocate 10-20% of your volume capacity for snapshots
- Low-change data (archives): ~5-10% overhead
- Medium-change data (documents): ~10-15% overhead
- High-change data (databases, VMs): ~15-25% overhead
Monitor snapshot consumption in Snapshot Replication > Snapshots > [Select folder] > Action > Calculate Snapshot Size
For optimal snapshot performance, consider using enterprise-grade NAS drives like the Seagate IronWolf Pro 18TB or WD Red Pro 22TB, which are designed for 24/7 operation and handle Btrfs workloads efficiently.
Database Performance Warning
High-frequency snapshots on active databases can cause performance degradation. Btrfs Copy-on-Write creates fragmentation on high-transaction workloads (SQL databases, VMs, Docker volumes).
Mitigation options:
- Use SSDs for database storage (dramatically reduces fragmentation impact)
- Reduce snapshot frequency to hourly instead of every 15 minutes
- Enable Application-Consistent Snapshots - For VMs and Exchange/SQL servers, install the Synology Storage Console to enable Application-Consistent snapshots, ensuring databases are quiesced before the snapshot is taken
- Disable CoW on database folders using
chattr +C(⚠️ WARNING: This disables snapshots for that folder) - Use dedicated database backup tools (e.g., mysqldump, pg_dump) as a complement to snapshots
For mission-critical databases, consider a hybrid approach: hourly snapshots + continuous transaction log backups.
How Can I Recover Files from a Snapshot?
Users can recover files via the #snapshot folder in Windows File Explorer or macOS Finder if "Make Snapshot Visible" is enabled. Administrators can perform full folder rollbacks using the Snapshot Replication app on the NAS.
You have three recovery options depending on the severity of the data loss:
Method 1: Self-Service Recovery (End Users)
If you enabled "Make snapshot visible" in the Advanced settings, users will see a #snapshot folder inside their network share.
Alternative: Mount as Virtual Drive (Advanced)
Administrators can mount any snapshot as a read-only virtual shared folder in File Station:
- Open Snapshot Replication > Snapshots
- Select a snapshot and click Mount
- The snapshot appears as a separate shared folder (e.g., "Documents_snapshot_2026-01-20")
- Browse the entire snapshot without restoring anything
- Unmount when finished
This is useful for verifying data integrity before performing a full rollback.
Windows Users:
- Open File Explorer and navigate to your network share
- Example:
\\NAS-SERVER\Documents
- Example:
- You'll see a
#snapshotfolder at the top of the directory - Open
#snapshotto see timestamped folders:#snapshot/ ├── @GMT-2026.01.20-09.00.00/ ├── @GMT-2026.01.20-10.00.00/ ├── @GMT-2026.01.20-11.00.00/ └── @GMT-2026.01.20-12.00.00/ - Browse to the timestamp before the file was deleted/corrupted
- Copy (not move) the file back to the live directory
Alternative: Windows Previous Versions
- Right-click any folder in the network share
- Select Properties > Previous Versions tab
- Choose a restore point from the list
- Click Restore or Open to browse
macOS Users:
- Open Finder and connect to your NAS share
- Go > Connect to Server (
smb://NAS-SERVER)
- Go > Connect to Server (
- Navigate to the shared folder
- The
#snapshotfolder appears as a regular directory - Browse timestamped folders and copy files back
Pro Tip: Reduce Helpdesk Tickets
Train users to check #snapshot before submitting IT tickets for deleted files. This can reduce recovery requests by 70-80% in typical office environments.
Method 2: Single File Restore (Administrator)
For users without direct snapshot access:
- Open Snapshot Replication app
- Go to Snapshots tab
- Select the shared folder
- Click Recovery button
- Choose "Browse and restore individual files"
- Select the snapshot timestamp
- Navigate to the file location
- Check the files to restore
- Choose restore location:
- Original location (overwrites current file)
- New location (creates a copy)
- Click Restore
Method 3: Full Folder Rollback (Disaster Recovery)
In the event of ransomware encryption or catastrophic corruption:
Safety Tip: Clone Before Reverting
Before performing a destructive rollback, you can clone a snapshot to a new folder to test the data:
- In Snapshot Replication, select the snapshot
- Click Clone instead of Revert
- Choose a new destination folder (e.g., "Documents_Recovery_Test")
- Verify the cloned data is intact
- Only then proceed with the live folder revert
This prevents accidentally reverting to a corrupted snapshot.
Full Rollback Procedure:
- Open Snapshot Replication app
- Go to Snapshots tab
- Select the affected shared folder
- Click Recovery button
- Choose "Revert the shared folder"
- Select the snapshot timestamp (e.g., 1 hour before attack)
- WARNING: This will overwrite ALL current data in the folder
- Click Revert
Recovery Speed:
- Instant metadata switch (~5-30 seconds regardless of data size)
- A 5TB folder reverts as fast as a 5GB folder
- No data copying occurs—Btrfs simply switches the active snapshot pointer
Important: Post-Rollback Data
After a full folder revert, any changes made after the snapshot timestamp are lost. The system can optionally save the "current" state as a new snapshot before reverting, giving you a chance to recover any critical last-minute changes.
Space Reclamation Note: After deleting large snapshots, free space may not appear immediately. Btrfs performs asynchronous cleanup in the background. Allow 24-48 hours for full space reclamation on large datasets.
Are Synology Snapshots the Same as Backups?
No. Snapshots are stored on the same volume as the original data and depend on the drive's health. Backups (via Hyper Backup) are independent copies stored on separate hardware or clouds. You need both for a 3-2-1 strategy.
Do not confuse snapshots with backups. If your RAID volume crashes or the physical NAS is destroyed by fire, your local snapshots are lost along with the data.
Snapshots vs. Backups Comparison
| Feature | Synology Snapshots | Hyper Backup (Traditional) |
|---|---|---|
| Speed | Instant (seconds) | Slow (limited by network/disk speed) |
| Storage | Delta-based (space efficient) | Full + Incremental (uses more space) |
| Protection | Accidental deletion, versioning, ransomware | Hardware failure, theft, disaster |
| Location | Same volume | External drive / Cloud (C2, S3) |
| Recovery Time | Seconds to minutes | Minutes to hours (depending on size) |
| Immutability | Yes (WORM in DSM 7.2+) | Limited (depends on destination) |
| Frequency | Every 15 min to hourly | Daily to weekly |
| Use Case | Operational recovery | Disaster recovery |
Verdict
Complementary Technologies
Use Snapshots for instant recovery from user error and ransomware. Use Hyper Backup to push data to cloud services like iDrive or an external USB drive for disaster recovery.
Neither replaces the other. A complete protection strategy requires both. Learn more about cloud backup options in our iDrive Business Review.
Real-World Scenario Examples
Scenario 1: Accidental File Deletion
- Problem: User deletes critical spreadsheet at 2:00 PM
- Solution: Snapshot recovery from 1:00 PM snapshot
- Recovery Time: 30 seconds
- Why not backup? Backup runs at midnight, would lose 14 hours of work
Scenario 2: Ransomware Attack
- Problem: Ransomware encrypts data at 3:00 AM
- Solution: Immutable snapshot from 2:00 AM (attacker cannot delete due to WORM protection)
- Recovery Time: 2 minutes for full folder revert
- Why not backup? Backup might not have run yet, or restore takes hours
Scenario 3: NAS Hardware Failure
- Problem: RAID controller fails, all volumes inaccessible
- Solution: Restore from Hyper Backup to replacement NAS
- Recovery Time: 4-8 hours (depending on data size)
- Why not snapshot? Snapshots are on the failed volume—completely inaccessible
Power Protection Recommendation: Protect your NAS from power-related failures with a quality UPS like the APC Smart-UPS 2200VA or CyberPower CP1500 to ensure graceful shutdowns during outages.
Snapshot Replication: Off-Site Protection
Snapshot Replication copies snapshots to a second Synology NAS (on-site or remote) for near-instant disaster recovery. Unlike Hyper Backup, which requires full restoration, replicated snapshots can be activated immediately if the primary NAS fails.
This is the enterprise-grade solution for businesses that cannot tolerate extended downtime.
How Snapshot Replication Works
- Initial Replication: Full copy of data to destination NAS (one-time, can take hours to weeks depending on data size and bandwidth)
- Ongoing Replication: Only snapshot deltas are transferred (fast, efficient)
- Failover: If primary NAS fails, activate the replicated share on the secondary NAS
- Failback: When primary is restored, reverse-replicate changes back
Pro Tip: USB Seeding for Large Datasets
For initial replication of large datasets (10TB+) over slow WAN links, use USB seeding:
- Connect an external USB drive to the source NAS
- Use Hyper Backup to create a full backup to the USB drive
- Physically transport the drive to the destination site
- Restore the backup to the destination NAS
- Then enable Snapshot Replication—it will only sync the delta changes
Example: A 20TB dataset over a 100 Mbps VPN would take ~18 days. USB seeding reduces this to 1-2 days of drive shipping + a few hours of delta sync.
Setup Requirements
- Two Synology NAS devices (both with Btrfs support) - Consider a DS925+ for the primary site and a DS923+ for the backup location
- Network connection between sites (VPN for remote replication) - See our NordLayer Business VPN Review for secure site-to-site connectivity
- Snapshot Replication package on both devices
- Sufficient storage on destination NAS
Configuration Steps
- On primary NAS, open Snapshot Replication
- Go to Replication tab
- Click Replicate button
- Choose "Replicate shared folder snapshots to another Synology NAS"
- Enter destination NAS details:
- IP address or hostname
- Admin credentials
- Destination shared folder
- Set replication schedule:
- Real-time: Immediate replication (requires good bandwidth)
- Scheduled: Every 15 min, hourly, or daily
- Enable "Encrypt replication transfer" for security
- Click Apply
Replication vs. Hyper Backup
| Feature | Snapshot Replication | Hyper Backup |
|---|---|---|
| Destination | Another Synology NAS | NAS, USB, Cloud (C2, S3, Azure) |
| Data Format | Live Btrfs snapshots | Compressed archive |
| Failover Time | Instant (activate share) | Hours (full restore required) |
| Bandwidth Usage | Low (delta sync) | High (full + incremental) |
| Use Case | Business continuity | Long-term archival |
| Cost | Requires second NAS | Cloud storage fees |
Best Practice: Hybrid Approach
For mission-critical data:
- Local snapshots (hourly, 24-hour retention)
- Replicated snapshots to second NAS (hourly, 7-day retention)
- Hyper Backup to Synology C2 or S3 (daily, 30-90 day retention)
This provides instant recovery (snapshots), fast failover (replication), and disaster protection (cloud backup).
The 3-2-1 Backup Strategy with Snapshots
3-2-1 Implementation with Snapshots
A complete data protection strategy:
-
Three copies of your data:
- Primary data on NAS
- Local snapshots (same NAS, different point-in-time)
- Off-site backup (cloud or second location)
-
Two different storage types:
- NAS (Btrfs with snapshots)
- Cloud storage (iDrive, AWS S3, Azure Blob)
-
One copy off-site:
- Snapshot replication to remote NAS, OR
- Hyper Backup to cloud service
Synology Snapshots provide the first two copies efficiently, while Hyper Backup or remote replication satisfies the off-site requirement.
Final Thoughts
Synology Snapshots have evolved from a convenient "undo" feature to an enterprise-grade ransomware defense system. The introduction of Immutable Snapshots (WORM) in DSM 7.2 makes Synology NAS devices viable for industries with strict compliance requirements, while the combination of local snapshots, replication, and cloud backups provides comprehensive protection against all data loss scenarios.
Key Implementation Checklist:
- ✅ Verify Btrfs file system on all volumes
- ✅ Update to DSM 7.2 or later
- ✅ Enable snapshot schedules with GFS retention
- ✅ Enable Immutable Snapshots with 7-14 day protection
- ✅ Make snapshots visible for self-service recovery
- ✅ Configure replication to second NAS (if available)
- ✅ Set up Hyper Backup to cloud or external drive
- ✅ Test recovery procedures quarterly
For businesses managing critical data, the combination of immutable snapshots and off-site replication provides recovery capabilities that previously required dedicated enterprise storage systems costing tens of thousands of dollars.
Ready to implement a professional snapshot strategy? Our team can help you configure Synology snapshots, set up replication, and design a complete 3-2-1 backup architecture tailored to your business needs.
Related Resources
- Synology NAS Review: Business Guide – Complete Synology NAS buying guide
- UGREEN vs Synology NAS Comparison – Alternative NAS options
- iDrive Business Review – Cloud backup solution for the 3-2-1 strategy
- NordLayer Business VPN Review – Secure VPN for remote NAS replication
- Small Business Network Security Audit Guide – Protect your entire infrastructure
Related Articles
More from Business Hardware
What Is AI NAS? Understanding Smart Storage for Business in 2026
AI NAS features face recognition, photo tagging, and local LLMs — but not all AI NAS is the same. Here's what the three types mean, and which one (if any) you actually need.
12 min read
Best NAS for Small Business 2026: Synology, UGREEN & UniFi Compared
Compare the top NAS systems for small business in 2026. Synology DS925+, UGREEN NASync DXP4800 Plus, and UniFi UNAS Pro reviewed with specs, pricing, and practical trade-offs.
20 min read
UniFi UNAS 2 vs UNAS 4 Review: Desktop NAS for Offices Without a Rack
UNAS 2 ($199) and UNAS 4 ($379) compared for real SMB deployment — specs, RAID options, caching limits, backup, file-server replacement, and practitioner guidance on desktop vs rackmount.
11 min read