Cable Management for Network Racks: 2026 Standards Guide
Professional cable management guide for 2026 network racks. Learn Cat6A requirements for Wi-Fi 7, PoE++ thermal management, SFP+ uplinks, and proper installation techniques for 10Gbps infrastructure.

Modern network racks face new physical constraints: deeper switches, hotter PoE++ loads, and thicker Cat6A cabling. A standard 48-port PoE++ switch now generates 600W+ of heat—equivalent to a small space heater inside your cabinet. Wi-Fi 7 Access Points often require 10Gbps backhaul, and many switches are 16-20" deep, making shallow wall-mount cabinets obsolete.
At iFeeltech, we've evolved our installation practices to address these challenges. This guide covers the technical requirements for modern rack deployments: Cat6A cabling for multi-gigabit infrastructure, thermal dissipation for high-power PoE devices, proper rack depth planning, and SFP+/DAC uplink configurations. Whether you're upgrading existing infrastructure or building from scratch, understanding these requirements ensures your network rack supports current technology and future growth.
Affiliate Disclosure: This article contains affiliate links. If you make a purchase through these links, we may earn a small commission at no extra cost to you.
Key Takeaways
| Key Aspect | Summary |
|---|---|
| Planning | Plan for 30% extra U-space and verify rack depth (20"+ for PoE++ switches). Account for thermal ventilation and Wi-Fi 7 cooling requirements. |
| Cabling Standards | Use Cat6A for all Wi-Fi 7 APs, PoE++ devices, and 10Gbps backhaul. Cat6 only for standard 1Gbps desktop connections. |
| SFP+ Uplinks | Use SFP+ DAC cables or fiber (LC-LC) for switch-to-switch uplinks instead of copper RJ45 patch cables for lower latency and heat. |
| Thermal Management | Avoid tight cable bundling with PoE++ loads. Follow TSB-184-A standards for loose bundling to prevent overheating. |
| Installation Order | Use "sandwich" layout: Patch Panel → 1U Cable Manager → Switch, with UPS at bottom for stability. Use 6-inch patch cables. |
| Testing & Labeling | Test all connections, verify thermal performance, and label both cable ends with unique IDs before final deployment. |
How do I plan a network rack for modern requirements?
Plan for 30% extra U-space and 6+ inches of extra depth. Modern racks must accommodate deeper PoE++ switches, thermal ventilation for 10Gbps equipment, and stricter bend radii for Cat6A cabling.
Map Your Equipment and Power Density
Don't just list devices—map the airflow and power density. A standard modern rack loadout includes:
- High-Power PoE++ Switches – Modern PoE++ switches are deeper (16-20" vs. 12-14" for older models) and generate more heat than legacy 1Gbps switches. They require proper ventilation and won't fit in shallow wall cabinets.
- SFP+ Aggregation – Plan space for fiber termination panels or SFP+ modules with DAC (Direct Attach Copper) cables for switch-to-switch uplinks. Modern racks use fiber/DAC for backbone connections rather than copper RJ45 patch cables.
- Cloud Gateways – Modern controllers like the UniFi Dream Machine Pro Max combine routing, security, and network management, replacing separate servers and controllers.
- Fiber ONT (Optical Network Terminal) – Most business ISPs now deliver via fiber rather than cable modems. Plan for LC fiber termination and proper bend radius protection.
- UPS (Uninterruptible Power Supply) – Mount at the bottom (U1-U3) for stability. Calculate total wattage including PoE++ loads, as 90W per port adds up quickly. Consider a rack-mount UPS for business deployments.
Critical: Check Rack Depth
Many users buy shallow wall-mount cabinets (18" deep) and realize too late that modern PoE++ switches (often 16-20" deep plus power cord clearance) don't fit. Verify equipment depth before purchasing a rack. For modern deployments, we recommend minimum 24" depth for floor racks and 20" for wall-mount cabinets.
Rack Placement and Thermal Considerations
Selecting an ideal location for the rack is critical due to increased heat generation from modern equipment:
- Cooling Requirements – Wi-Fi 7 infrastructure requires dedicated cooling or active ventilation. Multi-gigabit switches can draw 500W+ for a 48-port PoE++ configuration, generating considerable heat.
- Accessibility – Plan for front and rear access. Modern racks need rear access for SFP+ module installation and cable management.
- Proximity to Fiber Demarcation – Position racks near the ISP fiber entry point to minimize fiber extension runs.
- Secure Mounting – For wall-mount racks, concrete walls with proper backing are important. A fully loaded 12U rack with PoE++ switches can exceed 150 lbs.
By planning equipment depth, thermal requirements, and placement carefully, you'll set up your network for modern performance standards and avoid costly reinstallation.
Rack Unit Calculator
Use this table to estimate your rack space requirements. Always add 20% buffer for airflow and future expansion.
| Equipment Type | Typical U Height | Notes |
|---|---|---|
| Cloud Gateway/Router | 1U | UniFi Dream Machine Pro Max, similar devices |
| PoE++ Switch (24-port) | 1U | Standard enterprise switch |
| PoE++ Switch (48-port) | 1U | May require extra depth (16-20 inches) |
| Patch Panel (24-port) | 1U | Per panel in sandwich layout |
| Cable Manager | 1U | Horizontal brush or finger duct |
| UPS (1500-2200VA) | 2-3U | Rack-mount UPS at bottom |
| NVR/Server | 1-2U | Network video recorder or server |
| Shelf (non-rack equipment) | 1-2U | For modems, ONTs, etc. |
| Airflow Gap | 1U per 6U | 20% buffer recommended |
Example 24-Port Setup:
- UPS: 2U
- Patch Panel: 1U
- Cable Manager: 1U
- Switch: 1U
- Gateway: 1U
- Airflow buffer: 1U
- Total: 7U minimum (recommend 9-12U rack)
Should I use Cat6 or Cat6A for network racks?
Use Cat6A for infrastructure backbones, high-density Wi-Fi 7 Access Points, and PoE++ devices to support 10Gbps speeds. Cat6 works for 2.5GbE and 5GbE connections and standard desktop connections where cable flexibility is prioritized.
Cable Selection: Understanding Modern Requirements
Cable selection has evolved from a simple choice to a technical requirement based on your infrastructure needs.
- Cat6A (Recommended for High-Performance Infrastructure) – Necessary for any run connecting to high-density Wi-Fi 7 APs or 10GbE uplinks. Its thicker insulation prevents "alien crosstalk" and dissipates heat from PoE++ loads (up to 90W per port). Cat6A cable supports 10Gbps at full 100-meter distance and handles the thermal demands of PoE++ deployments.
- Cat6 (Suitable for 2.5GbE and 5GbE Connections) – Works well for 2.5GbE and 5GbE connections (supported up to 100 meters), as well as standard workstations requiring only 1Gbps. Cat6 is more flexible and easier to route in tight spaces. While Cat6 can handle 10Gbps up to 37-55 meters, it lacks the thermal headroom for sustained PoE++ operation.
- Fiber/DAC for Uplinks – For switch-to-switch uplinks, consider using SFP+ modules with DAC (Direct Attach Copper) cables for short rack connections (1-5 meters) or LC-LC fiber for longer runs. DAC cables offer lower latency, generate less heat, and reduce the cable bulk between switches.
Cat6A: Speed and Thermal Performance
While Cat6 can technically support 10Gbps for shorter distances, Cat6A is preferred for modern infrastructure primarily for thermal reasons. The thicker insulation of Cat6A better dissipates heat from PoE++ loads, preventing performance degradation in high-power deployments.
Essential Tools List
- Screwdriver Set – For mounting equipment and securing panels
- Wire Cutters and Stripper – To trim cables and prepare terminations
- Crimping Tool – For RJ45 connectors (though pre-terminated Cat6A is recommended)
- Cable Comb – Keeps cables organized and aligned
- Label Maker – Important for both-end cable identification
- Flush Cutters – For trimming Velcro straps without leaving sharp edges that can snag cables
- Cable Tester – For verifying connections during installation
Important: Avoid Zip Ties on Cat6A
Avoid using zip ties on Cat6A cables. Zip ties can crush the internal twist of Cat6A cables, potentially degrading signal quality and violating TIA-568 standards. Use Velcro (hook & loop) straps instead, which are reusable, adjustable, and won't damage cable geometry.
Essential Materials for Modern Racks
- Cat6A Patch Panels and Keystone Jacks – Ensure panels are rated for Cat6A (500MHz) not just Cat6 (250MHz)
- Short Patch Cables (6-inch to 1-foot) – For "sandwich" layout installations. Use pre-terminated Cat6A cables to avoid field termination errors.
- SFP+ DAC Cables – For switch uplinks (1m, 3m, 5m lengths). Verify compatibility with your switch brand.
- Velcro Straps (Multiple Widths) – ½" for small bundles, 1" for larger cable groups
- 1U Horizontal Cable Managers – Brush-style or finger-duct style for clean cable routing
- Fiber Termination Panel – If using LC-LC fiber for long uplinks or ISP handoff
- Labels and Label Maker – Use unique IDs (A01, A02) rather than descriptive names
Cable Management Techniques
Labeling Cables
Label both ends of every cable before you plug them in. Use a unique ID system (e.g., A01 = Panel A, Port 01) rather than writing descriptive names like "Bob's PC." Descriptive labels become outdated when users move or equipment changes. A label maker with heat-shrink or laminated labels ensures legibility over time, even in warm rack environments.
Cable Termination Standards
Proper termination is critical for Cat6A performance. Field termination of Cat6A requires precision—improper untwisting or compression can degrade 10Gbps performance. For rack installations, we strongly recommend pre-terminated Cat6A patch cables to avoid field termination errors. If you must terminate in the field, use a quality crimping tool and verify each termination with a cable certifier, not just a basic continuity tester.
Cable Routing
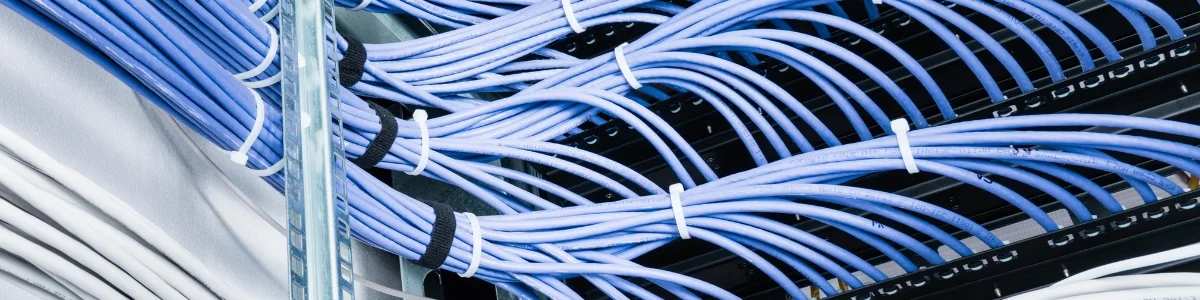
Proper cable routing reduces clutter and keeps cables from crossing over each other unnecessarily, which can create tension points and even damage cables. Using cable management accessories like D-rings, vertical organizers, and cable trays can help secure cables and guide them neatly along the rack. Overloading cable trays can lead to crushed cables, which impacts signal integrity, so allowing room for each cable is smart.
Color Coding
A consistent color-coding system can make managing cables easier, especially in larger setups. Using different colored cables to identify connections—such as blue for network, red for power, and green for VoIP—creates a simple visual map of the network. While there aren't formal standards, choosing a color system that suits your setup and sticking to it can reduce confusion and help new team members quickly understand the layout.
Is UniFi Etherlighting worth the cost?
For high-density environments or MSPs managing sites remotely, Etherlighting can reduce troubleshooting time through rapid port identification via color-coded LEDs, though it requires specific translucent patch cables.
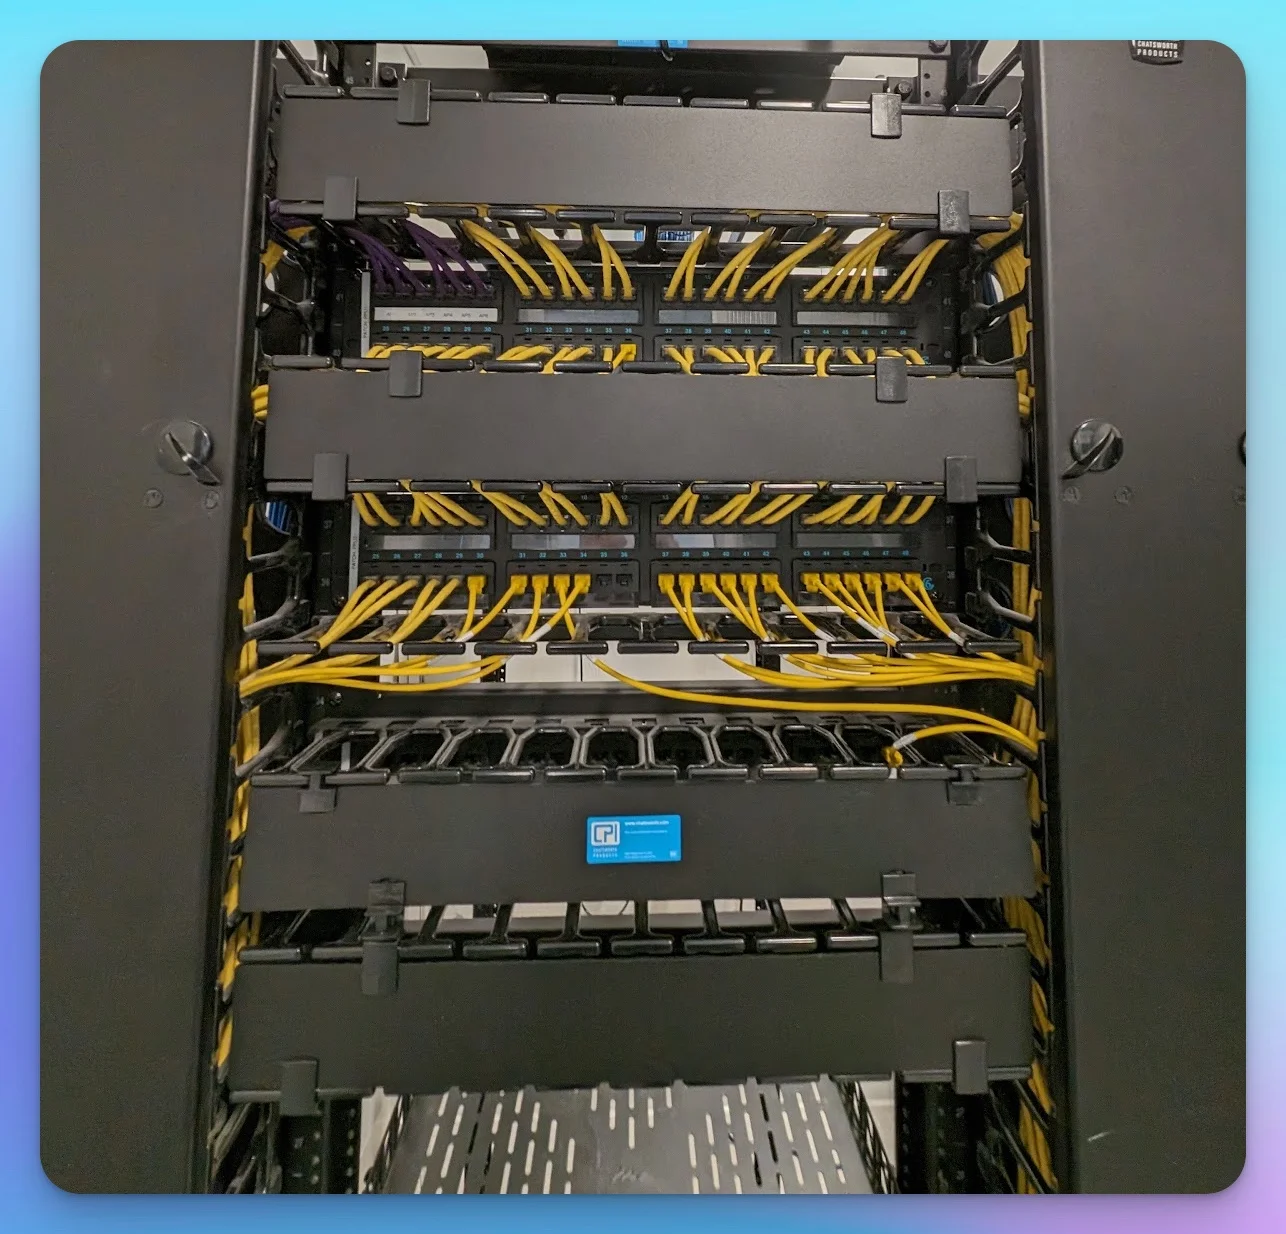
UniFi's Etherlighting technology available on Pro Max switches allows you to color-code ports logically through the UniFi controller interface:
- Blue – User Data / Workstations
- Purple – Wi-Fi Access Points
- Orange – Security Cameras
- Red – WAN / Critical Uplinks
Visual management can help non-technical staff assist with on-site troubleshooting. When a remote user reports connectivity issues, you can guide them to check specific color-coded connections rather than explaining complex port numbers.
Note: Etherlighting requires UniFi's specific translucent patch cables to see the full LED effect. If budget is a consideration, standard snagless Cat6A cables with color-coded jackets provide visual organization without the Etherlighting premium.
Meet UniFi - Introducing Etherlighting™
Cable Length and Routing
Choosing the correct cable length is important for modern rack standards. Excess slack creates heat pockets in PoE++ deployments and makes airflow management difficult. For the "sandwich" layout (Panel → Manager → Switch), use 6-inch to 1-foot patch cables to minimize cable volume and improve thermal performance.
When routing cables:
- Avoid tight 90-degree bends with Cat6A (minimum bend radius is 4x cable diameter)
- Limit bundles to 24 Cat6A cables when running PoE++ loads
- Route cables along the sides of the rack rather than across the center where they block airflow
Best Practice: The "Sandwich" Rack Layout
Install heavy power units (UPS) at the bottom for stability. Place patch panels at the top, followed by 1U cable managers and switches in a "sandwich" layout (Panel-Manager-Switch) to minimize patch cable length.
Step 1: Mount the UPS
Install the UPS at the bottom of the rack (typically U1-U3). This prevents top-heaviness and provides a stable center of gravity. A fully loaded PoE++ switch can weigh 40+ lbs, and mounting heavy equipment at the top creates tipping hazards for wall-mount racks.
Calculate total wattage requirements including PoE++ loads. A 48-port PoE++ switch can draw 740W at full load. Add gateway, APs, and other devices to determine proper UPS sizing.
Step 2: Install the "Sandwich" Layout
Instead of grouping all panels at the top and switches at the bottom, interleave them:
- Top: 24-Port Cat6A Patch Panel
- Middle: 1U Horizontal Cable Manager (brush strip or finger duct)
- Bottom: 24-Port PoE++ Switch
Why? This layout allows you to use short (6-inch to 1-foot) patch cables, eliminating the need for vertical cable managers and reducing cable clutter. Short cables also improve thermal performance by reducing cable volume in the rack.
Step 3: Install Additional Devices
Add other necessary devices:
- Cloud Gateway/Router – Modern UniFi Dream Machine or similar all-in-one devices
- Fiber ONT – If using fiber ISP handoff, mount near the top for easy fiber routing
- Non-Rackable Equipment – Use 1U or 2U shelves for devices without rack ears
Step 4: Terminate and Patch Cables
Terminate infrastructure cables to the patch panel using Cat6A keystone jacks. Verify each termination meets TIA-568-B standards. Once terminated, use short pre-terminated Cat6A patch cables (6-inch to 1-foot) to connect each patch panel port to its corresponding switch port.
Use Velcro straps to bundle cables loosely. Do not exceed 24 cables per bundle when running PoE++ to prevent thermal buildup per TSB-184-A standards.
Step 5: SFP+ Uplink Connections
For switch-to-switch uplinks, use SFP+ connections instead of copper RJ45:
- Short Runs (1-5m): Use SFP+ DAC cables. These are pre-terminated, low-latency, and generate minimal heat.
- Long Runs (5-100m): Use SFP+ fiber modules with LC-LC fiber cables.
- ISP Fiber Handoff: Connect fiber ONT to gateway/router using appropriate SFP module.
Consider avoiding RJ45 10Gbps copper uplinks between switches, as they generate more heat, consume more power, and add cable bulk.
Step 6: Label Everything
Label both ends of every cable before final installation. Use unique IDs (A01, A02, etc.) that correspond to a documentation sheet. This saves hours during troubleshooting and future modifications.
Installation Best Practice
The "sandwich" layout with short patch cables is the 2026 standard for professional rack installations. It reduces cable volume by 60-70% compared to traditional top-panel/bottom-switch layouts, improving both thermal performance and maintainability.
PoE++ Thermal Management: Important for Modern Deployments
With widespread PoE++ (90W per port) adoption, thermal management has become an important consideration for reliable operation. Tightly bundled Cat6A cables carrying high-power PoE loads can overheat, potentially increasing cable resistance and affecting network stability.
TSB-184-A Bundling Standards
The TIA TSB-184-A standard provides guidance for PoE cable bundling:
- Maximum Bundle Size: Limit bundles to 24 Cat6A cables when running PoE++ (90W) loads
- Loose Bundling: Leave air gaps between cables. Velcro straps should be snug but not overly tight
- Temperature Monitoring: In high-density PoE++ deployments, consider thermal monitoring of cable bundles
- Derating: Tightly bundled cables may require derating to lower power levels
Heat Dissipation Best Practices
- Avoid Center Routing: Route cables along the sides of the rack where airflow is better, not through the center
- Verify Airflow Direction: Most switches use front-to-back airflow, but some specialized equipment (AV-over-IP, certain enterprise switches) use side-to-side airflow. Verify your switch airflow direction matches your rack cooling strategy before installation.
- Stagger High-Power Ports: When possible, don't use all PoE++ ports consecutively. Distribute high-power devices across the switch
- Rack Ventilation: Ensure adequate front-to-back airflow. Consider adding 1U fan units for racks in warm environments
- Cable Spacing: In vertical cable managers, don't pack cables tightly. Allow 20-30% empty space for air circulation
Thermal Considerations
A 48-port PoE++ switch running at 80% capacity can generate 600W+ of heat. Combined with tightly bundled cables, this creates a thermal environment that can affect Cat6A performance and equipment lifespan. Proper cable spacing helps maintain reliable operation.
Testing and Final Touches
Test All Connections
For modern 10Gbps infrastructure, basic continuity testing may not be sufficient. Use a cable certifier (not just a tester) to verify Cat6A performance:
- Certification: Verify each Cat6A run meets TIA-568-C.2 Category 6A standards (500MHz, 10Gbps)
- PoE Testing: Verify PoE++ negotiation (IEEE 802.3bt Type 4) on all AP and camera ports
- SFP+ Links: Verify 10Gbps link speed on all SFP+ uplinks using switch diagnostics
- Thermal Check: After 30 minutes of operation under load, check cable bundle temperatures with an infrared thermometer. Bundles should stay below 60°C (140°F)
Final Cable Organization
After confirming connections are sound and thermal performance is acceptable:
- Adjust cable routing to ensure nothing blocks equipment access or airflow
- Verify all Velcro straps are snug but not crushing cables
- Confirm no cables are stretched tight or creating strain on ports
- Check that cable bend radii meet Cat6A specifications (minimum 4x cable diameter)
Documentation
Create a simple rack diagram showing:
- Device locations and U positions
- Cable ID mapping (which patch panel port connects to which switch port)
- SFP+ module locations and types
- PoE++ port assignments
- UPS runtime and load percentage
Store this documentation in a plastic sleeve attached to the rack or in your network management system.
Testing Standards for 10Gbps Infrastructure
Proper certification testing is important for 10Gbps infrastructure. A cable that passes basic continuity testing may still fail at 10Gbps speeds due to improper termination or excessive crosstalk. Certification testing helps avoid troubleshooting performance issues later.
Rack Grounding: Critical for Safety and Performance
Proper rack grounding is essential for both safety and network performance, especially with high-power PoE++ deployments and shielded Cat6A cabling.
Why Grounding Matters
Modern network racks with PoE++ switches and shielded Cat6A cable require proper grounding to:
- Drain Static Electricity: High-power PoE devices can build up static charges that need a path to ground
- Prevent Interference: Shielded Cat6A cable (common for 10GbE) must be properly grounded at both ends to prevent electromagnetic interference
- Electrical Safety: Protects equipment and personnel from electrical faults
- Equipment Protection: Provides a reference point for surge protection devices
Grounding Best Practices
- Bond the Rack: Connect the rack frame to building ground using a proper grounding conductor (typically 6 AWG copper minimum)
- Ground Bar Installation: Install a grounding bar in the rack for connecting equipment grounds
- Shielded Cable Grounding: If using shielded Cat6A, ensure patch panels and jacks properly bond the shield to rack ground
- UPS Grounding: Verify the UPS is properly grounded according to manufacturer specifications
- Verify Ground Quality: Use a ground resistance tester to verify proper grounding (should be <5 ohms resistance to earth ground)
Professional Grounding Installation
Rack grounding requirements vary by local electrical codes and building infrastructure. For commercial installations, consult a licensed electrician to ensure proper grounding that meets NEC (National Electrical Code) requirements and local regulations.
Common Grounding Mistakes
- Daisy-Chaining Grounds: Each rack should have its own ground connection to the building ground system, not daisy-chained through other racks
- Inadequate Wire Size: Using undersized grounding conductors that can't handle fault currents
- Poor Connections: Corroded or loose ground connections that increase resistance
- Ignoring Shield Grounding: Installing shielded Cat6A without properly grounding the shields
Conclusion
Proper network rack cable management has evolved beyond organization to become a technical requirement for reliable 10Gbps infrastructure. The shift to Wi-Fi 7, PoE++ power delivery, and SFP+ uplinks requires careful attention to cable specifications, thermal management, and installation techniques that weren't as critical in the 1Gbps era.
At iFeeltech, we've evolved our installation practices to meet these modern standards. The key differences in contemporary deployments:
- Cat6A is recommended for Wi-Fi 7 and PoE++ infrastructure
- Thermal management through proper cable bundling (TSB-184-A standards) helps prevent performance issues
- SFP+ DAC/fiber uplinks offer advantages over copper patch cables for switch interconnects
- Rack depth verification prevents equipment compatibility issues
- Certification testing ensures 10Gbps performance beyond basic connectivity
Whether you're upgrading existing infrastructure or building from scratch, following these modern standards helps ensure your network rack supports current technology demands and provides room for future growth. The "sandwich" layout, proper thermal spacing, and Cat6A cabling may require more upfront planning, but they can deliver better performance and reliability than legacy approaches.
For business owners investing in network infrastructure, understanding these technical requirements helps avoid building a rack that looks organized but may not support modern equipment loads. With proper planning and execution, your network rack can provide a stable foundation for reliable service. Learn more about our structured cabling services or server room setup for comprehensive infrastructure planning.
Frequently Asked Questions
What depth network rack do I need for modern PoE++ switches?
Modern PoE++ switches typically require minimum 20" depth for wall-mount racks and 24" for floor racks. Many current-generation switches are 16-20" deep plus power cord clearance.
Verify your specific switch model's depth before purchasing a rack. A common issue is buying shallow wall-mount cabinets that can't accommodate modern equipment. Check manufacturer specifications and add 4-6" for cable management and power cord routing.
Why is Cat6A recommended for Wi-Fi 7 Access Points?
High-density Wi-Fi 7 Access Points often benefit from 10Gbps backhaul and PoE++ (90W) power delivery. Cat6A supports 10Gbps at full 100-meter distance while handling the thermal load of PoE++ effectively.
While many Wi-Fi 7 APs can operate on 2.5GbE with PoE+ (like UniFi U7 Pro), high-density models benefit from 10Gbps backhaul. Cat6 is limited to 10Gbps at 55 meters maximum and has less thermal headroom for sustained PoE++ operation. Cat6A's thicker insulation prevents alien crosstalk and dissipates heat from high-power PoE loads, making it well-suited for modern Wi-Fi infrastructure.
How many Cat6A cables can I bundle together with PoE++?
Limit bundles to 24 Cat6A cables when running PoE++ (90W) loads, per TSB-184-A standards. Tighter bundling can cause thermal buildup that may increase cable resistance.
Use loose bundling with Velcro straps (avoid zip ties) and leave air gaps between cables. For high-density PoE++ deployments, consider thermal monitoring of cable bundles to help ensure temperatures stay below 60°C (140°F).
Should I use SFP+ DAC or fiber for switch uplinks?
Use SFP+ DAC cables for short runs (1-5m) within the same rack. Use LC-LC fiber for longer runs (5-100m) between racks or floors. Both offer advantages over RJ45 copper uplinks.
DAC cables offer lower latency, generate less heat, and reduce the cable bulk of thick Cat6A patch cables. They're pre-terminated and passive (no power required). Fiber provides longer reach and complete electrical isolation. RJ45 10Gbps copper uplinks consume more power and generate more heat.
What is the sandwich layout for network racks?
The sandwich layout alternates patch panels and switches (Panel → Cable Manager → Switch) instead of grouping all panels at top and switches at bottom. This allows 6-inch patch cables, reducing cable volume by 60-70%.
Traditional layouts require long patch cables that create clutter and heat pockets. The sandwich approach places each switch directly below its corresponding patch panel, enabling ultra-short connections that improve thermal performance and simplify troubleshooting.
Why should I avoid zip ties on Cat6A cables?
Zip ties can crush the internal twist geometry of Cat6A cables, potentially degrading 10Gbps performance and violating TIA-568 standards. Velcro (hook & loop) straps are reusable and won't damage cable structure.
Cat6A maintains 10Gbps performance through precise internal wire twisting. Zip ties can create compression points that alter this geometry, potentially increasing crosstalk and signal loss. Velcro straps distribute pressure evenly and allow adjustment without cable damage.
Do I need cable certification testing or just continuity testing?
For 10Gbps infrastructure, cable certification testing to TIA-568-C.2 Category 6A standards is recommended. Basic continuity testers only verify connectivity, not 10Gbps performance at 500MHz.
A cable can pass continuity testing but may not perform well at 10Gbps due to improper termination, excessive crosstalk, or bend radius violations. Certification testing measures insertion loss, return loss, and alien crosstalk—all important for reliable 10Gbps operation. This helps prevent performance issues after deployment.
How much power does a PoE++ switch consume?
A 48-port PoE++ switch can draw 740W at full load (90W × 48 ports ÷ efficiency). At typical 80% utilization, expect 600W continuous draw plus switch overhead, totaling 650-700W.
This is significantly higher than legacy PoE switches (300-400W). Size your UPS accordingly and account for heat generation—600W of power becomes 600W of heat that must be dissipated. Ensure adequate rack ventilation for PoE++ deployments.
What is the minimum bend radius for Cat6A cables?
Minimum bend radius for Cat6A is 4× cable diameter during installation and 8× cable diameter for permanent installation. For typical 0.35" Cat6A cable, this means 1.4" minimum bend radius.
Tight bends alter the internal wire geometry, degrading 10Gbps performance. Use proper cable routing with gradual curves, not sharp 90-degree turns. This is especially critical in high-density rack environments where space is limited.
Where should I mount the UPS in a network rack?
Mount the UPS at the bottom (U1-U3) for stability. A UPS can weigh 40-80 lbs, and top-mounting can create tipping hazards, especially in wall-mount racks.
Bottom mounting lowers the center of gravity and helps prevent rack instability. It also makes UPS battery replacement easier—you won't need to support heavy equipment while working. Calculate total PoE++ load before sizing your UPS to ensure adequate runtime.
Related Resources
- Network Cabling Checklist – Pre-installation planning guide
- Best Ethernet Cable Guide – Cat6 vs Cat6A detailed comparison
- IT Server Room Setup Guide – Complete server room planning
- UniFi Pro Max Etherlighting Revolution – Color-coded port management technology
Related Articles
More from Network Infrastructure
Essential Network Cabling Checklist for 2026 (Free PDF)
Complete network cabling checklist for business owners. Learn why Cat6A is the 2026 standard, installation best practices, PoE budgets, and future-proofing for Wi-Fi 7. Download our free PDF checklist.
13 min read

Dual WAN for Business: Why One Internet Connection Isn't Enough
Why a single ISP is a single point of failure, how to verify real route diversity, and which dual-WAN gateway and backup connection fit a rack network or a simple branch office.
19 min read
How Often Should You Replace Your Router? The Security Signs We Look For on Every Job
Forget the 'every 3–5 years' rule. Here's the field checklist we run on a client's router before replacing it — plus what 4 years of fleet data says about how long networking gear actually lasts.
11 min read